There are a number of different tools that allow you to validate and test a Drupal site. Inspecting your custom code allows you to adhere to coding standards and ensure that you stamp our common coding problems. Adding tests allows you to make certain that the functionality of your Drupal site works correctly.
If you have tests in your Drupal project then you ideally need to be running them at some point in your development workflow. Getting GitHub to run the tests when you push code or create a pull request means that you can have peace of mind that your test suite is being run at some point in workflow. You also want to allow your tests to be run locally with ease, without having to remember lots of command line arguments.
In this article I will show how to set up validation and tests against a Drupal site and how to get GitHub to run these steps when you create a pull request. This assumes you have a Drupal 10 project that is controlled via composer.
Let's start with creating a runner using Makefile.
Makefile
A Makefile is an automation tool that allows developers to create a dependency structure of tasks that is then run by using the "make" command. This file format was original developed to assist with compiling complex projects, but it can easily be used to perform any automation script you need.
For example, let's say that we want to allow a command to be run that has a number of different parameters. This might be a curl command or even an rsync command, where the order of the parameters are absolutely critical. To do this you would create a file called "Makefile" and add the following.
sync-files:
	rsync -avzh source/directory destination/directory
To run this you just need to type "make" followed by the name of the command.
make sync-files
You now have a repeatable task that will run a set bash script exactly the same way every time.
This is preferable to creating single shell scripts that run each action as with Makefile you can create dependencies for each of your tasks. So, in the above example we could say that before we run the rsync command we need to create the destination directory. All we have to do is create another task that will perform this action and set this as a prerequisite of the sync-files command.
create-destination-directory:
    mkdir -p destination/directory

sync-files: create-destination-directory
	rsync -avzh source/directory destination/directory
One thing I use a quite often is the "@" symbol at the start of the commands. This tells make to run the command, but not to print out the command being run on the command line. This cleans up the output a little, but is is down to personal preference really. Here's the same rsync command with this option added.
sync-files:
	@rsync -avzh source/directory destination/directory
There's a lot more to Makefiles than I can cover here, but this is essentially the basic setup. Whilst it is a little tricky to get into the syntax of a Makefile they can be useful for quickly running tasks that would otherwise mean looking up parameters or copying from a text file of useful commands.
If you want to know more about make then I can recommend reading https://makefiletutorial.com/ as this will take you through all of the syntax of a Makefile in simple to understand examples.
The idea behind using Makefiles here is to simplify the process of running commands on GitHub, but also to make it easier for developers to run the same commands. Makefiles makes it easy to group everything under a single command using the prerequisites feature. Doing this will allow you to install Drupal and run entire testing stack using just a single command.
Alternatively, you can use composer actions or some other automated script to perform the tasks, although composer actions don't support dependencies so you might need to create a series of bash scripts to perform the actions. It's also possible to use something like Robo to run tasks for you, and I have experimented with this in the past. Ultimately, you need some way of installing your PHP dependencies before you can run them, which means you need a Makefile or script somewhere in your workflow.
Whatever technology you select, the key to simplifying your GitHub workflows is weighting the commands more on the Makefile side, which means your GitHub actions can be nice and concise.
DDEV
In order to simplify the tasks being run (and the environment they are run on) I tend to use DDEV. Using this platform allows for a consistent and repeatable environment that you can easily configure to have different setups. The rest of the examples in this article will feature the "ddev" command (where appropriate) that will execute the command within the docker environment created by DDEV.
Using a docker environment also means that all of the paths for the system will be the same on every machine that runs the environment, which helps to simplify the setup process.
DDEV is useful when you want to perform updates and need to ensure that they function correctly. For example, if you want to see if your site will function on a new version of PHP then you just need to make that change in the configuration and create a pull request. The GitHub actions will find the new configuration and perform your tests with the new version in mind.
Install Drupal
The first task to perform with any setup is to install the Drupal, first by installing the composer packages and any node packages we may require. When we start a DDEV environment it will automatically copy the Drupal settings.php file into the correct place, so we don't need to worry about that here.
Once the Drupal codebase is in place you can then install Drupal and compile any theme assets required. The following make command will install composer and node packages and then hand off the Drupal install and theme compile tasks to secondary make commands.
setup-drupal:  ## Install dependencies, install Drupal, and compile the theme.
	@ddev composer install --prefer-dist --no-progress
	@ddev exec --dir=/var/www/html/docroot/themes/custom/my_custom_theme npm install
	@ddev exec npm install
	$(MAKE) site-install
	${MAKE} themebuild
The site install command will install Drupal using Drush. I have found from experience that dropping and re-installing the database entirely helps ensure that the environment is clean. For example, when running migration tests you might find that if you don't drop all tables first then some of the migration tables will be present after you re-install the site. We also perform a cache clear as well as an additional configuration import to make sure that the site is up to date.
site-install: ## Install the Drupal site.
	@ddev drush sql-drop --yes
	@ddev drush si standard --existing-config --yes --account-name=admin --account-pass=admin
	@ddev drush cr
	@ddev drush cim -y
This does assume that you are using the standard install profile to install your site (not always the case) and that you have some configuration to import. If you are using multi-site setups then you'll need to change this to install one or more variants of the site for testing.
Once that task is complete the Drupal site will be running.
It's at this point that you might want to think about using Default Content Deploy to inject some testing content into your site. This isn't a requirement, except if you are going to perform any behavioural or regression testing on the site. Having content present for these types of test is essential and Default Content Deploy is the best way that I have found to do this.
The final step here is to build the theme assets, which will entirely depend on what package you use to manage your theme. I use grunt on a couple of projects so this is an example of using grunt to compile the theme assets.
themebuild: ## Build the theme.
	@ddev exec --dir=/var/www/html/docroot/themes/custom/my_custom_theme npx grunt
I should note that there's no extra installation steps to be performed before we can run npm or npx as it these packages come pre-installed with DDEV.
Validation
Before we start testing the code we need to make sure that it is valid. I normally separate out the validation and the testing workflows as there is no point in wasting time on running a full test suite if some of the code in your codebase is invalid.
There are a number of things we can do to ensure that a Drupal codebase is valid, starting with validating the composer files.
Composer Validate
The simplest validation task we can run is to validate the main composer.json and composer.lock files, which is achieved with the command "composer validate".
composer-validate: ## Validate Drupal composer.json and composer.lock.
	@ddev composer validate
Having invalid composer files can often mean that something went wrong during the composer workflow and can cause problems later down the line when you attempt to update composer packages again.
PHP Code Sniffer
PHP Code Sniffer allows you to check your Drupal custom code for Drupal coding standards. There's a lot of reasons why you want to use coding standards in your project, the least of which is to ensure that common bugs and security issues are corrected before they reach your production environment. PHP Code Sniffer will also check your Drupal YAML configuration files to ensure that no common issues are found.
To install PHP Code Sniffer on a Drupal codebase you can follow along with my article detailing how to install and run the tool.
Once installed you can run the phpcs command to inspect your Drupal codebase. As this requires a fair amount of arguments to achieve we create a make command to do this for us.
phpcs: ## Run phpcs analysis.
	@ddev exec vendor/bin/phpcs --standard=Drupal,DrupalPractice --exclude=SlevomatCodingStandard.Namespaces.AlphabeticallySortedUses --extensions=php,module,inc,install,test,profile,theme,info,txt,yml --ignore=node_modules,bower_components,vendor web/modules/custom web/themes/custom web/profiles
Remember that we are only interested in the PHP code we have written ourselves, which means we specifically point the phpcs command at our custom codebase. There's no point in inspecting the entire Drupal core and contributed codebase as this will have already been checked by the tools available on drupal.org.
PHP Code Sniffer also comes with the PHP Code Beautifier and Fixer tool, which can be run with the phpcbf command.
phpcbf: ## Run phpcbf.
	@ddev exec vendor/bin/phpcbf --standard=Drupal,DrupalPractice --extensions=php,module,inc,install,test,profile,theme,info,txt,yml web/modules/custom web/themes/custom web/profiles
The phpcbf tool can be used to fix a lot of coding standards errors quickly, so it's useful to add to your make file so that you can easily run it.
Note that all of the paths in the above command must exist in order for the tool to run correctly. You can remove "web/profiles" if you are not making use of install profiles on your site.
PHPStan
PHPStan is a tool that will statically analyse PHP code to look for common problems that might cause bugs. It needs a couple of helper packages to install the tool, but I have written all about how to install and use PHPStan in a Drupal codebase. You also need to create a phpstan.neon configuration file, which is automatically picked up by the tool when run.
Once installed and configured, the tool can be run through make.
phpstan: ## Run PHPStan analysis.
	@ddev exec vendor/bin/phpstan
To make the best use of PHPStan you need to set to the right level, this is all handled in the phpstan.neon file so the make command just needs to run the tool. My advice is to start at level 0 and solve everything that is uncovered by the tool. Then, you need to agree with the rest of your team what level you want to reach so that everyone is on the same page.
Eslint
Eslint is a JavaScript static analysis tool that analyses your JavaScript for best practice and potential bugs. It can also be used to validate the syntax of your YAML files, which can catch issues that the PHP Code Sniffer inspection can miss.
Drupal comes with everything you need to get up and running with Eslint and the setup-drupal command at the start installed the tool as part of the "npm install" command.
You need to create an .eslintrc.json file in the root of your project (if this isn't already present) to configure the tool. The "rules" area of this file allows you to turn off certain inspection criteria, which is useful if you want to use things like "++" in your custom code.
Here is an .eslintrc.json file that I often use in projects. The auto-detection of the react version is also added to this file is used to correct a small warning that appears when the tool is run.
{
  "extends": "./web/core/.eslintrc.json",
  "rules": {
    "no-plusplus": "off"
  },
  "settings": {
    "react": {
      "version": "detect"
    }
  }
}
It's also a good idea to have an ignore file that you can use to skip over anything that you don't want to lint. This is the case if you have any vendor directories in your codebase that contain third-party packages in them.
docroot/modules/custom/my_custom_theme/js/vendor/
Once you have that in place you can run the eslint tool, passing in the configuration file with the -c flag and the ignore file with the --ignore-path file.
eslint: ## Run eslint.
	@ddev exec npx eslint -c .eslintrc.json --ignore-path .eslintignore web/modules/custom
	@ddev exec npx eslint -c .eslintrc.json --ignore-path .eslintignore web/themes/custom
To assist your team locally you can add an "eslint-fix" task that will attempt to fix any coding standards issues that the tool finds.
eslint-fix: ## Run eslint with the --fix flag.
	@ddev exec npx eslint -c .eslintrc.json web/modules/custom --fix
	@ddev exec npx eslint -c .eslintrc.json web/themes/custom --fix
Running eslint-fix can often solve the majority of the issues detected, which means you can concentrate on fixing the issues that matter.
Again, note that the directories here must exist before they can be scanned. You can comment them out with a "#" at the start of the line.
Testing
Ideally, you should have a number of tests in your Drupal site. These can be split into unit tests and behavioural tests, but it is essential that we can run them on any platform required.
PHPUnit
Drupal's internal testing system is powered by PHPUnit and can be used to test individual functions, service classes, or user interaction.
To get PHPUnit running on your Drupal site you need to copy the phpunit.xml.dist file from the core directory in your Drupal install into the root of your project. There's a few settings in the file that need changing so that they point at the correct place, but once done you can commit this file to your project.
The tests themselves are easily run inside the DDEV environment, but we first need to ensure that the correct output directories are in place (with the correct permissions) before we can run the test. The following make command handles this.
phpunit: ## Run the Drupal phpunit tests for custom code.
	@ddev exec mkdir -p /var/www/html/private/browsertest_output
	@ddev exec chmod -R 777 /var/www/html/private/browsertest_output
	@ddev exec mkdir -p web/sites/simpletest/browser_output
	@ddev exec chmod -R 777 web/sites/simpletest
	@ddev exec ./vendor/bin/phpunit web/modules/custom/
This will run the unit tests across all of the custom modules in the project.
Cypress
Cypress is a behavioural testing system that acts like a user would on your Drupal site, logging in and interacting with it. These types of tests are tricky as they need to be run on your local environment. Well, that's not strictly true as they can run in a headless browser on any environment, but I've often found that the best results come from running it locally.
I often install Cypress next to the Drupal web root in a directory called "tests/cypress", so the following examples take that into account.
cypress: ## Run Cypress tests
	cd tests/cypress && npx cypress run
Cypress tests don't have access to the Drupal database, so there's also the question on managing the environment for the tests themselves. I've found that re-installing Drupal can lead to timeout errors on some environments, so I tend to opt for a re-import of the content using Default Content Deploy. I have written about using Cypress and Default Content Deploy in a previous article.
One command that I also include is a shortcut to the Cypress GUI, which is a powerful development tool that shows the tests being run in real time.
cypress-gui: ## Open the Cypress GUI
	cd tests/cypress && npx cypress open
Makefile Meta Steps
To speed things up you should create meta steps in your Makefile so that you can run lots of actions at once using the prerequisites feature. We just setup a load of tasks for validating and testing the codebase and it doesn't make sense to run them one by one. Using the prerequisites feature means that we can create simple make tasks that will only run the tasks we have created.
To this end we need to make two tasks, one for validation and another for tests. The "validation" make command is perhaps the most busy:
validate: composer-validate phpcs phpstan eslint ## Validate the project.
The tests can then be run in one go with a "test" make command.
test: phpunit cypress ## Run all of the tests.
With these tasks in hand we can now create out GitHub workflows.
GitHub Workflows
At this point you should be able to run either all or part of your install and test process using the Makefile. I won't go too into detail here about the GitHub workflow file as there is already some pretty good documentation on the file itself. I will go through the creation of a workflow file that will run all of the validation and tests for our Drupal site.
The workflow YAML file needs to live in the directory ".github/workflows/". I tend to call my file "test.yml" since this perfectly describes what it is doing.
The start of the file contains the name and details about when the workflows will be run. It is possible to get GitHub to run your workflow on a variety of different events on the platform.
The following shows the start of a typical GitHub workflow file that details the name and a number of actions. In this case we will run the workflow when a commit is pushed to a branch starting with the name "feature/", or when a pull request is created against the branches "main" or "stage".
name: Run tests

on:
  push:
    branches:
      - 'feature/**'
  pull_request:
    branches:
      - main
      - stage
      - prod
Next is the section that details the jobs that must be run for this workflow. The "test" workflow detailed below will run on the latest version of Ubuntu and has a number of steps.
jobs:
  test:
    runs-on: ubuntu-latest
    steps:
       # Steps go here...
Let's define a few steps.
First, we need to checkout the codebase we want to test, which is done using the "actions/checkout" package. There are a lot more options available in this package, but we only need the default options for our purposes.
- name: Check out repository code.
  uses: actions/checkout@v4
As we are using DDEV we also need to include a step to let GitHub know about DDEV. This is done using the ddev/github-action-setup-ddev package. Again, there are lots of options available for this system, but as the DDEV environment will be automatically run we don't need to do anything else here.
- name: Include ddev runner.
  uses: ddev/github-action-setup-ddev@v1
With the DDEV environment ready we can now start installing the site, which is done using the "make setup-drupal" command we created at the start. Once this task has finished the site will be fully running within the DDEV environment on GitHub.
- name: Setup drupal for testing.
  run: make setup-drupal
Before running the tests we need to run our validation tasks using the "make validate" command.
- name: Run validate handler.
  run: make validate
Here is where our workflow differs slightly from the local environment. The PHPUnit tests and the Cypress tests need to be run in separate tasks due to the way in which the Cypress tests are run (more on that in a minute). To run the PHPUnit tests we just call our "make phpunit" command.
- name: Run test handler.
  run: make phpunit
The best way I have found of running Cypress tests on GitHub is by using the cypress-io/github-action package. This makes ready all of the things we need for our Cypress tests to run and we only need to include the "working-directory" directive as the Cypress tests aren't in the root of our project.
- name: Run cypress tests.
  uses: cypress-io/github-action@v6
  with:
    working-directory: tests/cypress
This task will automatically trigger our Cypress tests and will return the correct failure state if one of them fails.
That's all we need to add to our GitHub workflow file, here it is in full.
name: Run tests

on:
  push:
    branches:
      - 'feature/**'
  pull_request:
    branches:
      - main
      - stage

jobs:
  test:
    runs-on: ubuntu-latest
    steps:
      - name: Check out repository code.
        uses: actions/checkout@v4

      - name: Include ddev runner.
        uses: ddev/github-action-setup-ddev@v1

      - name: Setup drupal for testing.
        run: make setup-drupal

      - name: Run validate handler.
        run: make validate

      - name: Run test handler.
        run: make phpunit

      - name: Run cypress tests.
        uses: cypress-io/github-action@v6
        with:
          working-directory: tests/cypress
The file we create here is deliberately short because we added the complexity to the Makefile, rather than to this file. It also means that the configuration for your system is part of your codebase, rather than as part of the workflows.
Now that everything is in place you should check the actions permissions of your project in GitHub to make sure that you can actually run the workflow. These are the main permissions you should be looking at (which is within the "hashbangcode" GitHub profile.
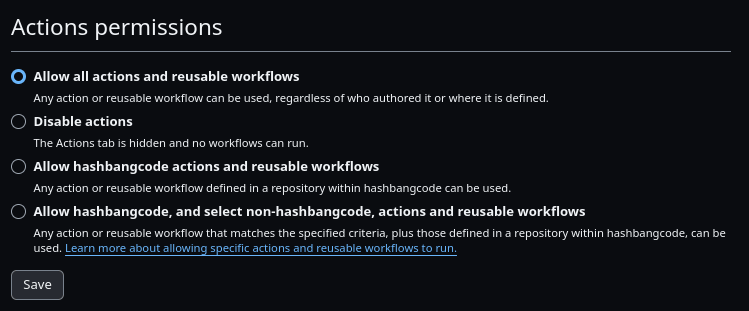
This "allow all actions" is quite an open permission, but it allows us to use actions from different repositories to checkout the code, run DDEV, and perform Cypress tests.
With all this in place you can now perform validation and testing checks on your Drupal codebase by either pushing to a "feature/x" branch or by creating a pull request against the main or stage branches.
Conclusion
With this technique in hand you can now push code to GitHub and automatically run validation and testing steps on your code. This provides a reliable safety net for your code so that you can be sure that everything is complaint and works correctly with every change that is added to your system.
I wanted to provide as much detail as possible to allow anyone to create their own workflows and actions in a few minutes to get started with continuous integration on GitHub. Even if you have no tests in your Drupal project you can make a start with code validation and then start writing tests with the detail posted here. Let me know if you get stuck with any part of this, I would appreciate the feedback.
The addition of workflows also integrates nicely with the GitHub interface. All workflows that pass will receive a nice little green tick, showing that they cleared all of the validations and checks in your workflow.
It is possible to take the GitHub workflow file a lot further than I have shown here, but I've found that adding complexity to this file often causes problems when attempting to debug problems with the workflow. If you are able to go from a blank slate to a fully validated and tested environment locally using one or two make commands then there's a good chance that the same will apply on GitHub.
The GitHub workflow can be taken in other directions as well. For example, you can also create a workflow that will trigger a deployment of your code to the platform of your choice. Again, I would suggest passing the actual build process off to another application like Ansible or Deployer, rather than add that complexity to the GitHub workflow file.
Deliberately adding the complexity of the project setup and validation/testing steps to the Makefile also allows us to port this technique to other systems with relative ease. For example, if we wanted to use GitLab then we could create a ".gitlab-ci.yml" file and add the needed make commands to that file in order to trigger the same actions on that platform. You would need to account for the presence of DDEV on that environment, but there are ways around using the DDEV wrapper and opting for pure docker commands if required.

Comments
This article provides a great overview of how to streamline running Drupal tests on Github using workflows. I particularly liked the part about using Makefiles to automate tasks such as running PHP Code Sniffer, Composer Validate, and Eslint. This approach not only simplifies running tests but also ensures consistency across environments.
Submitted by Mandy on Fri, 04/12/2024 - 16:29
PermalinkAdd new comment