Setting up a Drupal 8 site for a multi-site environment with a common configuration isn't too hard, it just requires a little bit of forethought and some planning to get things right. You need to have a default configuration in mind, and then think about how each site can override this configuration in different ways. I have seen it done wrong a few times recently and once you go down the wrong path, getting things back in line again can be a difficult.
The default configuration covers things like content types, vocabularies, fields, views, enabled modules, or anything else that would make up the structure of the site. Each sub-site would override this by adding configuration for theme components, custom block placement, or anything else that is custom to that site.
The key element of a multi-site setup like this is the Configuration Split module (aka. "config split"). This module allows you to have a default configuration and then allow sites to override this default configuration or even add configuration custom to just that site. Configuration Split is most commonly used to create a difference between dev, test and production sites, but it can also be used to create sub sites as well. There are two types of configuration overrides that Configuration Split provides. Namely Conditional / Graylist and Complete / Blacklist.
- Complete / Blacklist - This is any configuration that doesn't exist in the default configuration. It therefore should only exist on the sub-site it configures. This would be things like custom fields or content types that are only available for a single site. Perhaps the most common use of blacklists is to configure any content block placements as these require content being created in order to work correctly. In terms of the files in your configuration this means that only this site will have a copy of the configuration file.
- Conditional / Graylist - This is any configuration that exists in the default configuration, but which is overridden on this site. This would be things like system.site.yml configuration file, which contains the name of the site but could be literally any other configuration file. In terms of the files in your configuration this means that each site will have a copy of the configuration file.
Recent versions of the Configuration Split module have dropped the graylist/blacklist text from the admin forms, as the configuration produced still shows this text I'll still refer to it as graylist/backlist in this post. To be honest I can see why this has been done as when you're first getting to grips with the module the graylist/blacklist can be a little confusing.
With this module installed we can look at setting things up.
Setting Up Configuration Split
Before setting up any splits you first need to create a Drupal site that will act as the default environment. This is perhaps the most important thing to get right. You'll need to know before hand exactly what will go into the site and create the site in the appropriate way. Try to create a site with as many default elements as possible, without adding any hard customisations as this will make life easier in the long run. Be sure to avoid any form of content like taxonomy terms or content blocks as these tend to cause problems with moving configuration between sites.
Once that is setup enable the Configuration Split module and go over to the administration page Home > Administration > Configuration > Development > Synchronize > Configuration Split Setting. You'll see no configurations set up so just click on the Add Configuration Split Setting button. On this page you'll see several form elements so I'll go through them all here.
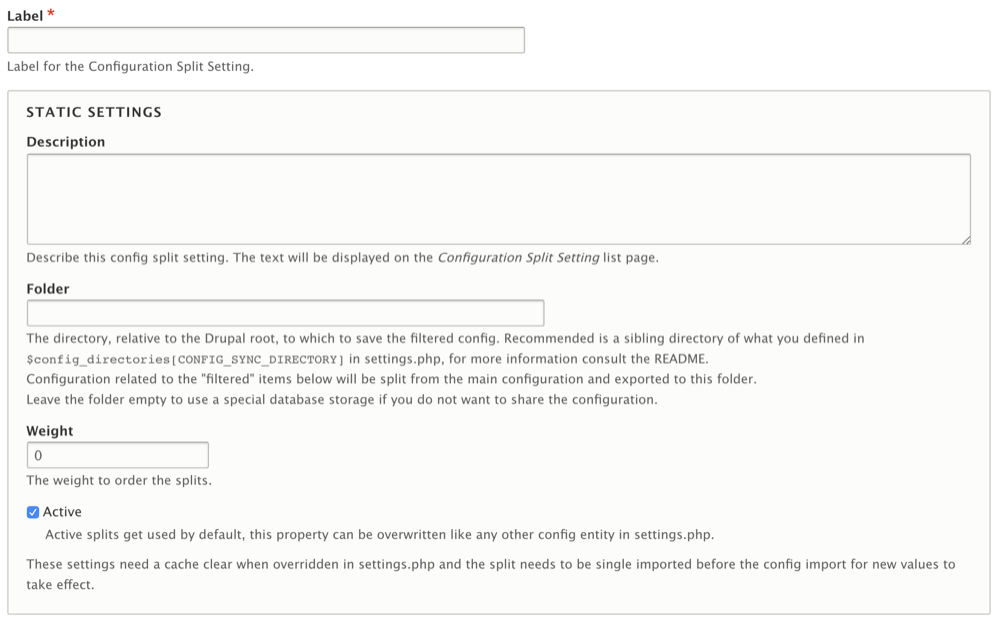
The Label is just the human readable label for the site, but as this will be translated into a machine name it's important to get it right as this will have a bearing on your setup later. What you put in here will be 'slugged' into a string and used as the ID of the split. For example, if you put in My Site that text will get slugged to my_site, but you can edit this in the same way as you would alter field names.
The Static Settings part of the form allows you to set some global attributes of the config. The Description is just a more text to describe the configuration split being setup. The Folder is the location of the configuration directory, relative to the Drupal docroot. This will depend on what setting you have set for your default configuration directory (set with $config_directories['sync'] in your settings.php file) but it's a good idea to have this as a sibling of that default directory. You'll probably want to set this to be something like ../config/my_site, giving it the same name as the configuration split ID to keep things nice and easy to understand.
The Weight is used when you have different configurations that need to apply against the same site. This allows you to set one configuration higher than the other if you happen to have multiple splits active. For the purposes of this setup the weight is not a factor so just leave this as 0.
The Active setting tells Drupal if the configuration should be used or not. The default is 'Active' but I highly advise to turn this OFF when creating configuration splits. The ideal situation should be that all configuration splits are off and you use logic in your settings.php file to turn on the configuration split that should be active. I'll come onto this aspect later.
Next up is the Complete Split or Blacklist configuration. This is split into 3 parts. You can either select all the configuration for a single module, pick individual configuration items, or enter the configuration items you want to be included into the text box. Anything you select from this section will be excluded from the default configuration and will only be available in the sub-site configuration.
Even on a default Drupal install there is quite a bit of configuration to go through so having to poke through that list can be a bit of a problem. Thankfully, if you enter configuration items into the text area then the module will transfer these into the list of configuration items meaning that you don't have to select them all individually.
When creating the configuration split for the first time you can just leave this bit blank.
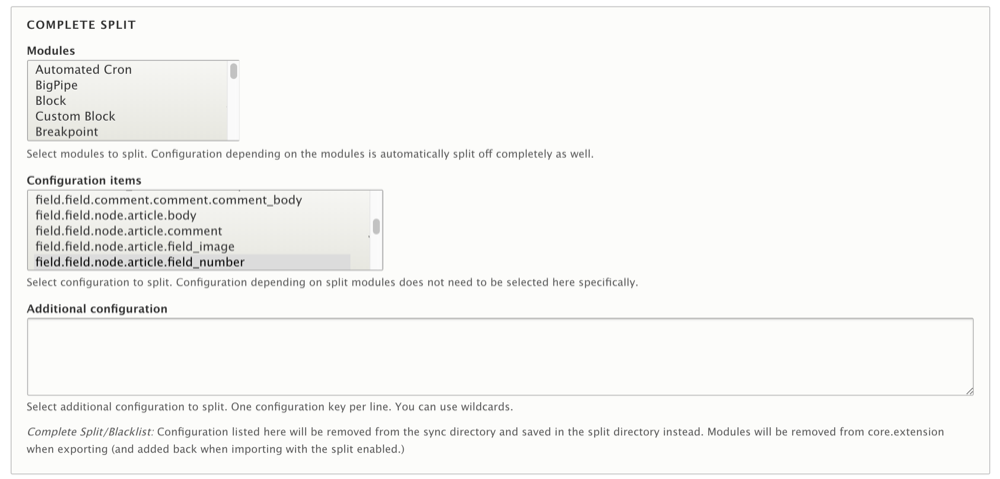
One very important thing to remember is that you should never add core configurations to the blacklist. Adding files like system.site.yml or core.extension.yml will cause the configuration to become corrupted. This is because these files are required by a Drupal instillation and must be present in the default configuration directory to work correctly. Without those files in the default configuration your configuration imports will simply fail to run.
The final thing is the Conditional Split or Graylist configuration. This is where you override things that are already in the default configuration. You can specify the configuration to graylist either by picking it out of a list or by adding them one a time to the text area. Just like the blacklist, if you do enter anything in the text box that is already in the configuration of the site then it will automatically get picked up.
When setting up the configuration split for the first time you can just leave this blank.
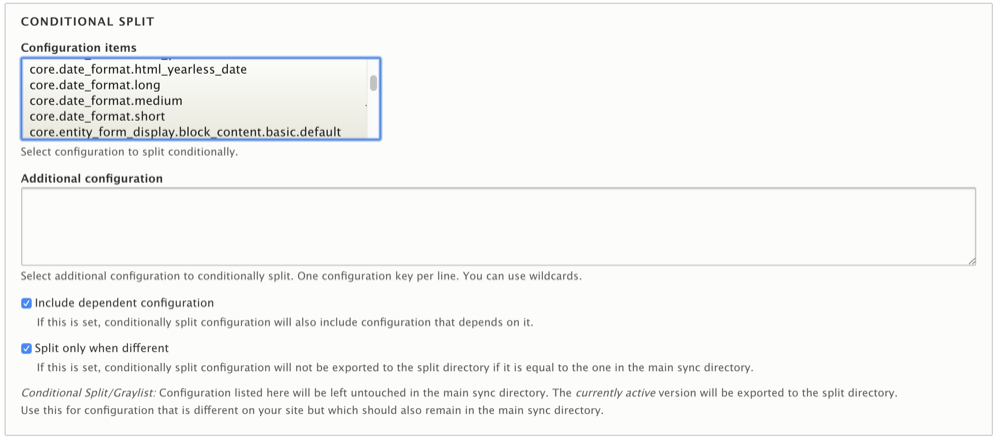
There are two additional options for the graylist configuration that change the way in which the graylist files and managed. The option to include dependent configuration for graylist will do just as it describes and add any other dependent configuration items from the items you have included. Leaving this option on can be useful to keep your configuration stable but it can add configuration items that you aren't expecting. The other option to split the graylist only when it's different will copy configuration files from your default configuration into the configuration splits only if the configuration files are different. This option should be left on at all times as you only want to move configuration around if it is different. Ideally, you don't want to have configuration files moving around unless you really have to, so this option helps to keep the configuration noise to a minimum.
To start with you want to leave the black and gray lists empty. But you'll also need to create the directory you stipulated in your configuration before going any further. The module won't let you save the form unless that directory exists.
Once that is saved you can then export the entire configuration for the default site using drush cex. In my setup Configuration Split generated a file called config_split.config_split.my_site.yml that looks like this.
uuid: b97e7b96-1b0f-4105-bce8-2f3b044ea49a
langcode: en
status: false
dependencies: {  }
id: my_site
label: 'My Site'
description: ''
folder: ../config/my_site
module: {  }
theme: {  }
blacklist: {  }
graylist: {  }
graylist_dependents: true
graylist_skip_equal: true
weight: 0
Your starting point in a multi-site setup should be to add the system.site.yml configuration to the graylist as this is where you can change the name of your site. This would alter the split to look like this:
uuid: b97e7b96-1b0f-4105-bce8-2f3b044ea49a
langcode: en
status: false
dependencies: {  }
id: my_site
label: 'My Site'
description: ''
folder: ../config/my_site
module: {  }
theme: {  }
blacklist: {  }
graylist:
  - system.site
graylist_dependents: true
graylist_skip_equal: true
weight: 0
This means that when you export the configuration for the "My Site" site it will create a copy of system.site.yml in the config/my_site configuration directory with the changes to the configuration.
Create one Configuration Split entry for every multi-site that you need to create and make sure they are exported into your default site config.
Creating Multi-Site Splits
With all that in place it's time to spin out the first multi-site.
After setting up the Drupal multi-site setup in the usual way you can then install the site using the latest version of Drupal. From Drupal 8.6.0 it has been possible to install sites using an existing configuration. This was previously only possible using a project called Configuration Installer or creating a profile using Install Profile Generator so this is pretty convenient. When you have an empty database and a configuration in place you will see an extra instillation profile available that will use any existing configuration.
One word of warning if you are doing this is not to have a install profile with a hook_install() hook as this currently isn't supported in Drupal 8.6.3. If you've installed using the Standard profile (or similar) then you can modify the install profile used in core.extension.yml to remove any mention of the standard profile.
Before installing the site you'll want to enable the configuration split for that site. This is done be editing the settings.php file in the appropriate multi-site and adding the following configuration override. This is why we set the configuration splits to be inactive, the idea being that you only want to set the correct configurations to be enabled at any time.
$config['config_split.config_split.my_site']['status'] = TRUE;
Once the site has installed you can configure it to suit your needs and then export the configuration for the site when you are ready. The only difference here is that you also need to include the --uri flag so that Drush knows what site it is looking at.
drush cex --uri=mysite.example.com
This command will produce a list of configuration items that have changed from the default. You can use this list as a way of updating the Configuration Split admin page to set up you blacklist and graylist settings correctly. For example, after installing the site I added a field to the Article content type and changed a couple of other settings and this is the configuration synopsis that I received.
+------------+-----------------------------------------------+-----------+
| Collection | Config                                        | Operation |
+------------+-----------------------------------------------+-----------+
|            | field.storage.node.field_number               | Create    |
|            | field.field.node.article.field_number         | Create    |
|            | system.date                                   | Update    |
|            | system.site                                   | Update    |
|            | core.entity_form_display.node.article.default | Update    |
|            | core.entity_view_display.node.article.default | Update    |
+------------+-----------------------------------------------+-----------+
This is where you can start altering the blacklist and graylists settings in your configuration split. Using this list it's clear to see that any items that have been created for this site should go into the blacklist and that any items updated in the configuration should go into the graylist. Go back into the configuration split settings are for this site and add the relevant configuration items back into the config. After exporting all of the configuration again and accepting the changes (this time including the configuration split settings) the configuration split configuration file looks like this.
uuid: b97e7b96-1b0f-4105-bce8-2f3b044ea49a
langcode: en
status: false
dependencies: {  }
id: my_site
label: 'My Site'
description: ''
folder: ../config/my_site
module: {  }
theme: {  }
blacklist:
  - field.storage.node.field_number
  - field.field.node.article.field_number
graylist:
  - system.date
  - system.site
  - core.entity_form_display.node.article.default
  - core.entity_view_display.node.article.default
graylist_dependents: true
graylist_skip_equal: true
weight: 0
The "My Site" configuration directory now contains the configurations that have changed.
$ ls -1 config/my_site/
core.entity_form_display.node.article.default.yml
core.entity_view_display.node.article.default.yml
field.field.node.article.field_number.yml
field.storage.node.field_number.yml
system.date.yml
system.site.yml
Note that some blog posts will tell you that you need to run drush csex <split name> in order to export the configurations for your splits. However, since Drush version 8.1.10 this isn't required any more.
All that is needed is to repeat this process of install, configure, export for any extra sites you want to create.
Dev, Stage and Prod
The last little piece to this puzzle is creating different splits for different environments. This requires the creation of additional splits that stipulate the different environments.
The critical thing to watch out for here is that you cant nest configuration directories. For example, if you have your configuration in config/my_site then you can't put the dev site configuration in config/my_site/dev. The config detection can't drill into directories like this so you need to create then as sibling directories so that the dev version of the My Site is kept at config/my_site_dev.
There is a way around this situation. If you put your configuration split for the site into config/my_site/config then you can have a structure that looks like this.
config/my_site/config
config/my_site/dev
config/my_site/test
Setting up your sites like this is a good idea if you plan on having many sub-sites as it helps cut down the number of directories in your configuration.
To get the environments working you just need to modify the configuration split detection so that it can activate if certain environmental settings are in place. This will depend on what kind of server setup you have in place, but you'll want to have something like the following in place. It's a good idea to also make the production configuration the default so that if any problems to arise then the production configuration will be automatically active.
The following code would be added to your site settings.php file in order to automatically activate the correct config split.
if (getenv('DEV') == TRUE) {
  $config['config_split.config_split.mysite_dev']['status'] = TRUE;
}
else {
  $config['config_split.config_split.mysite']['status'] = TRUE;
}
Summary
Configuration split can be used with the Drupal multi-site functionality to create a powerful setup for your sites. You can create lots of sites that inherit a single configuration set, whist having enough freedom to do their own thing. This approach does take a little bit of planning to get right, but as long as you start down the correct path then everything should work correctly.
Comments
Very good post! Thanks!
Submitted by Lucas on Fri, 02/08/2019 - 17:50
PermalinkThank you for pulling everything together in one place !!!
Submitted by Kalpana on Sat, 07/25/2020 - 23:37
PermalinkThank you for the post! Have y'all considered writing another article for Config Split 2.0? :)
Submitted by Nathan Tsai on Wed, 02/16/2022 - 01:51
PermalinkThanks Nathan. That's a good idea for an article. I'll add it to the list!
Submitted by philipnorton42 on Wed, 02/16/2022 - 09:00
PermalinkAdd new comment