I've seen lots of "our team" pages over the years, but one of the ones that stood out to me the most were those that had an interactive element to them. For me, it adds a bit of personality to the page and makes it feel more alive than a bunch of silhouettes of the directors, or just a generic team group photo.
I remember seeing a team page a while ago that had a number of little images of people that looked at the mouse pointer as it moved around the page. Each face in the picture looked in all 8 directions as my mouse pointer went around the screen. This caught my interest so I had a look to see how it worked.
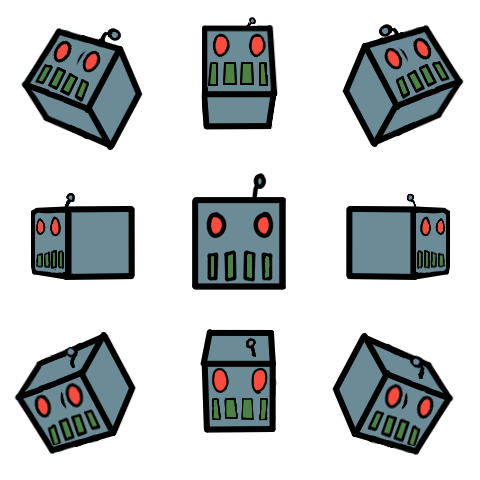
The page used a combination of a fixed element dimension and background positioning of an image to show only a part of it at once. By combining this with a little bit of JavaScript the page created an interactive image without having to load lots of images, just one for each team member. The image was pretty simple as it just needs to be a square of 9 images, one for each direction the mouse lies in, and a central one to look straight ahead when the mouse hovers over the iamge.
I've been toying with the idea around this code for a while, so I thought I would put together a couple of examples of how to do this in an article.
In this article we will look at how to set up the image we need for this process to work and then create the JavaScript needed to change the image so that it appears to look around the page.
Setting Things Up
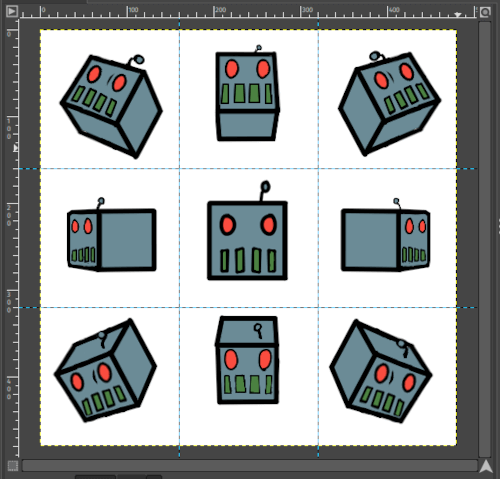
The first thing we need to do is create the image that will be used to imitate the face looking at the mouse as it moves around the screen. I created a guide in Gimp that contained a 480px square image and equally spaced grid lines separating the 9 different parts of the image. Here's a screenshot of the guide in Gimp with a little robot face added.

You can download this template from the GitHub repository and modify it to suit your needs.
Here's the image that we will use for the examples in this article.

Just right click on the image to download it and use it in the examples below. You can also download this image directly from GitHub. Thank you to Matthew Norton for creating this image for me, it's really good!
The image is placed onto the page using a div tag with a data-image attribute that contains the path to the image. A div is used as we need to have the block be a particular size and have the background position set accordingly.
<div id="facelook1" data-image="robot_face.png"></div>
We could use an image here, and indeed I initially tried to use an image, but there are a few issues with this. You could set the src property of the image element, but this gets in the way of the background and ruins the effect. It is possible to leave out the image src entirely, but any alt text added to the element is shown over the top of the background. A simple div doesn't have any unwanted side effects.
In order to set the size and background of this element we need to use a little function that takes the element ID and adds the needed styles.
function prepareElement(elementId) {
	let element = document.getElementById(elementId);
	element.style.backgroundImage = 'url(' + element.dataset.image + ')';
	element.style.backgroundPosition = '-160 -160';
	element.style.width = '160px';
	element.style.height = '160px';
	return element;
}
This could be translated into a little block of CSS, but the dynamic image replacement means that we need to dynamically allocate the image dimensions as the page is loaded. You can add additional styles to improve the initial look and feel of the block if you want, but that is outside the scope of this article.
The prepareElement function needs to be wrapped in a window load function so that it is triggered when the DOM is ready. We create a list of elements that contain team members faces so that we can have lots of images on the page follow the mouse around. In the same callback we also add an event listener that listens to the mouse movements and triggers an event.
window.onload = function windowOnload() {

	var elements = [
		prepareElement("facelook1"),
	];

	document.addEventListener("mousemove", (event) => {
		// Add logic for look function here.
	});
}
All we have to do now is fill in the content of the event listener callback function. There are a few ways in which to create the effect of watching a mouse move around the screen so we will look at using a bounding box method (the simple way) and a angle calculation method (a less simple way).
The Simple Way
The simple way of doing this is to figure out what segment of the screen that the mouse is currently in and move the background of the image by a pre-calculated amount.
This method could be written as a massive collection of if statements, but I found it a little better to collect all of the conditions into an array and loop through this array until we find the correct solution. The array has two elements for each part, one for the test of the mouse position and the second to set of the background offset. Here is the code in full.
document.addEventListener("mousemove", (event) => {
	var currentx = event.pageX;
	var currenty = event.pageY;

	elements.forEach(element => {
		var rect = element.getBoundingClientRect();

		var tests = [
			// North west.
			[rect.left > currentx && rect.top > currenty, '0px 0px'],
			// North.
			[rect.left + rect.width > currentx && rect.left < currentx && rect.top > currenty, '-' + rect.width + 'px 0px'],
			// North east.
			[rect.left + rect.width < currentx && rect.top > currenty, '-' + (rect.width * 2) + 'px 0px'],
			// West.
			[rect.left > currentx && rect.top + rect.width > currenty && rect.top < currenty, '0px -' + rect.width + 'px'],
			// Over.
			[rect.left + rect.width > currentx && rect.left < currentx && rect.top + rect.width > currenty && rect.top < currenty, '-' + rect.width + 'px -' + rect.width + 'px'],
			// East.
			[rect.left + rect.width < currentx && rect.top + rect.width > currenty && rect.top < currenty, '-' + (rect.width * 2) + 'px -' + rect.width + 'px'],
			// South west.
			[rect.left > currentx && rect.top + rect.width < currenty, '0px -' + (rect.width * 2) + 'px'],
			// South.
			[rect.left + rect.width > currentx && rect.left < currentx && rect.top + rect.width < currenty, '-' + rect.width + 'px -' + (rect.width * 2) + 'px'],
			// South east.
			[rect.left + rect.width < currentx && rect.top + rect.width < currenty, '-' + (rect.width * 2) + 'px -' + (rect.width * 2) + 'px'],
		];

		tests.forEach(function (item, index, array) {
			if (item[0]) {
				element.style.backgroundPosition = item[1];
				return;
			}
		});
	});
});
The reason we can get this working is due to the event having coordinate properties and the use of the getBoundingClientRect function. When an event in JavaScript is triggered you can extract the coordinates of the event using the pageX and pageY properties. The getBoundingClientRect function is a built in JavaScript function that returns a number of different properties connected to the element in question. In the code here we are using left, top and width in combination to calculate the middle of the image and where the mouse pointer is in relation to that.
For more information about the getBoundingClientRect function see the Mozilla MDN web docs page.
The Less Simple Way
The second method also makes use of the pageX and pageY coordinates of the event and the getBoundingClientRect() function, but here we using a little bit of math to calculate the angle of the mouse pointer in relation to the image in question.
The function calcualteAngle() does this and takes the x,y coordinates of the mouse and the x,y coordinates of the image.
// Calculate the angle of the mouse to the image.
function calculateAngle(mouseX, mouseY, positionX, positionY) {
	// Offset coordinates to center.
	xD = mouseX - (positionX);
	yD = mouseY - (positionY);
	// Get the angle of the mouse relative to the central position of the element.
	return Math.atan2(yD, xD) * 180 / Math.PI;
}
The result of this function is an angle and we can use a an if or switch statement to re-position the background position to the correct segment. We also have simple clause at the start for when the mouse pointer is over the element in question.
document.addEventListener("mousemove", (event) => {
	var currentx = event.pageX;
	var currenty = event.pageY;

	elements.forEach(element => {
		var rect = element.getBoundingClientRect();

		if (currentx >= rect.x && currentx <= rect.right && currenty >= rect.y && currenty <= rect.bottom) {
		    // Outward.
			element.style.backgroundPosition = '50% 50%';
			return;
		}

		var centerX = rect.x + (rect.width / 2);
		var centerY = rect.y + (rect.height / 2);

		angle = angleMath(currentx, currenty, centerX, centerY);

		switch (true) {
			case (angle <= 22.5 && angle > -22.5):
				// East.
				element.style.backgroundPosition = 'right';
				break;
			case (angle <= 67.5 && angle > 22.5):
				// Southeast
				element.style.backgroundPosition = 'bottom right';
				break;
			case (angle <= 112.5 && angle > 67.5):
				// South
				element.style.backgroundPosition = 'bottom';
				break;
			case (angle <= 157.5 && angle > 112.5):
				// Southwest
				element.style.backgroundPosition = 'bottom left';
				break;
			case (angle <= -157.5 || angle > 157.5):
				// West
				element.style.backgroundPosition = 'left';
				break;
			case (angle <= -112.5 && angle > -157.5):
				// Northwest.
				element.style.backgroundPosition = 'top left';
				break;
			case (angle <= -67.5 && angle > -112.5):
				// North
				element.style.backgroundPosition = 'top';
				break;
			case (angle <= -22.5 && angle > -67.5):
				// Northeast.
				element.style.backgroundPosition = 'top right';
				break;
		}
	});

});
This works really well. In fact, either strategy I have detailed here will perform the same action. What's more, you can add multiple images to the page and have them all follow the mouse pointer independently.
If you want to try out the look I have created a demo that shows this in action.
All of the code here, including the images and Gimp templates, is available for free on GitHub.


Add new comment