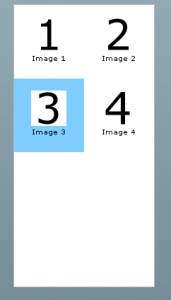
A TileList is part of a group of elements that allow you to add components in a specific order and orientation. The TileList controls the displaying of a number of items set out as tiles and so it best suited to displaying images as thumbnails.
There are many ways to do this, but none of the examples on the Flex site seemed to be very useful, or very well explained. What I wanted to do was to create a TileList that displayed the tiles in a certain way and used an XML file to fill up the list of items with images, each image having a label associated with it.
The first thing to do is to create the TileList element.
<mx:TileList id="imageTileList"
itemRenderer="CustomItemRenderer"
dataProvider="{theImages}"
width="200"
height="400"
columnCount="2"
creationComplete="initList();"/>
This contains three important attributes, which I have described here.
itemRenderer="CustomItemRenderer"
This attribute is used to tell the TileList how to display each element within the list. The CustomItemRenderer refers to a file called CustomItemRenderer.mxml that contains the following:
<?xml version="1.0" encoding="utf-8"?>
<mx:VBox xmlns:mx="http://www.adobe.com/2006/mxml"
horizontalAlign="center"
verticalAlign="middle"
verticalGap="0"
width="80"
height="100"
paddingRight="5"
paddingLeft="5"
paddingTop="5"
paddingBottom="5"
>

<mx:Image height="50" width="50" source="{data.strThumbnail}" />
<mx:Label height="20" width="75" text="{data.title}" textAlign="center" color="0x000000" fontWeight="normal" />
</mx:VBox>
This tells the TileList that each item should be kept in a VBox element, which contains an Image element to contain the image and a Label element that contains the label for that image. The source and the text attributes for the Image and Label elements respectively are used to tell the elements what data is to go where.
dataProvider="{theImages}"
This is a reference to an ArrayCollection element that provides a mechanism to access the data within the TileList element. This ArrayCollection element looks like the following and needs to be placed as a direct child of the Application element.
<mx:ArrayCollection id="theImages"></mx:ArrayCollection>
creationComplete="initList();"
This is an event call that allows us to populate the TileList just after is has been added to the application. The initList() function call is where everything is put together.
The next step is to add a reference to the XML file that contains the information we want to populate the TileList with. Place this as a child of the Application element.
<mx:Model id="items" source="items.xml" />
This references a file called items.xml, which has the following contents.
<?xml version="1.0" encoding="utf-8"?>
<items>
 <image id="1">
    <title>Image 1</title>
    <strThumbnail>one.png</strThumbnail>
 </image>
 <image id="2">
    <title>Image 2</title>
    <strThumbnail>two.png</strThumbnail>
 </image>
 <image id="3">
    <title>Image 3</title>
    <strThumbnail>three.png</strThumbnail>
 </image>
 <image id="4">
    <title>Image 4</title>
    <strThumbnail>four.png</strThumbnail>
 </image>
</items>
Finally, we are ready to write some code to get this thing working. The first thing we need to do is create a little helper class that will allow us to convert the XML into a usable format. Create a file called ItemListObject.as and put the following contents in it.
package
{
 [Bindable]
 public class ItemListObject extends Object
 {
  public function ItemListObject() {
   super();
  }

  public var title:String = new String();
  public var strThumbnail:String = new String();
 }
}
Next, you can create your Script element, which contains two main parts. The first is a command that makes the ItemListObject (from the ItemListObject.as) file available to other functions, and the second is the all important call to the initList() function.
<mx:Script>
 import ItemListObject;

 public function initList():void
 {
  for each ( var node:Object in items.image ) {
   var temp:ItemListObject = new ItemListObject();
   temp.strThumbnail = node.strThumbnail;
   temp.title = node.title;
   theImages.addItem(temp);
  }
 }
</mx:Script>
The initList() function works by getting hold of the items XML file and converting it into an array. For team item it creates a ItemListObject and adds in the Image and Label parts before adding this to the TileList data provider. If everything is working properly then this should produce the following result.


Comments
Submitted by Agha Faisal on Tue, 02/24/2009 - 11:18
PermalinkAdd new comment