I was doing some research into the Raspberry Pi a while ago and I happened to come across a neat little enclosure for the Raspberry Pi Compute Module 4 (CM4) called the uConsole.
The CM4 is essentially a normal Raspberry Pi 4, but it comes without the normal USB/HDMI interfaces that the Pi 4 comes with. This means that in order to use the CM4 you need to plug it into a separate PCB, which then provides the interfaces needed to attach monitors and peripherals.
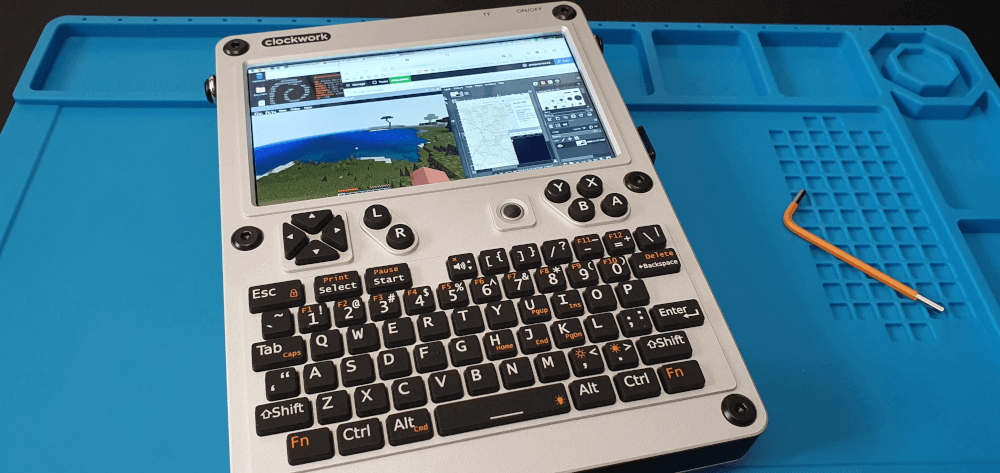
This is where the ClockworkPi uConsole comes in. The uConsole (or micro console) is an enclosure for the CM4 that features a built in screen and keyboard, a track ball, small speakers, a battery pack, and an optional mobile network card.
After reading up on the company and the console itself I decided to order one and see how it went. Clockwork produce the uConsole on demand, meaning that they make and ship the units in small batches. There is also a bit of a worldwide shortage of the CM4 so that is also causing a delay in getting the units shipped.
As a result, delivery of the uConsole can take at least 90 days, but I have heard reports of it taking nearly a year from purchase to delivery. Whilst that's a really long time, it is somewhat understandable for a niche product like this. The good news is that clockwork have a good track record of fulfilling their orders so when you place an order there's a very good chance that you will receive the unit.
I took the plunge and ordered the uConsole without the optional mobile network card or the the CM4. Since the CM4 from ClockworkPi is a 4GB model I decided to order the CM4 separately from a UK shop called The Pi Hut, which meant I could go for the 8GB CM4 and slightly increase the performance of the unit. This, I think, was a good choice as I received my unit in just 8 weeks, much less than the estimated 90 days for delivery. The CM4 from The Pi Hut arrived in just a couple of days.
In this article we will look at the shopping list for the uConsole, the assembly, and how I have been using the unit for the last couple of months.
Shopping List
The uConsole is just one component needed to get this working, the other being the CM4 itself. Since I bought a few thing for this console I thought a shopping list would be useful.
- The uConsole, without the CM4 or mobile chip - £95 (+£32 for shipping)
- CM4 Lite, 8GB RAM - £74
- 2 x 18650 batteries - £16
- A 256GB micro SD Card - £40
- A glass screen protector - £5
- A travel case - £6
All together this is £257 for the fully functioning computer, plus an additional £11 for the extra screen protector and case.
You could probably save some money with a smaller micro SD card here as 256GB is massive unless you fill the card up with thousands of movies, images, and music. I wouldn't however, get a smaller version of the CM4 as 8GB of RAM really allows the system to work well.
Assembly
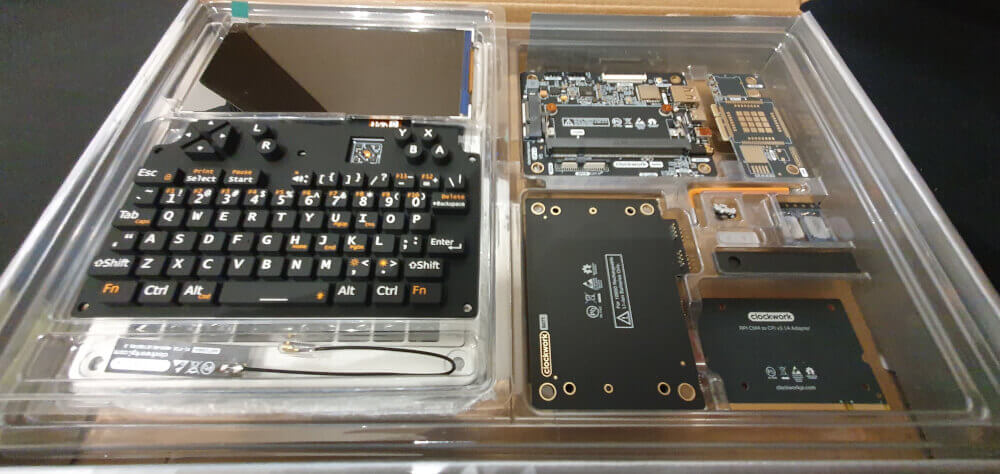
I had a really fun time putting this unit together. Everything comes in a box with all the separate components fitted neatly into plastic shells. Included in the components is a small hex key, which is the only tool needed to put the unit together.
There's also a full paper manual that takes you through every step in the process, which also points at potential issues in the assembly. The assembly guide reads like a Lego manual, which is a really nice touch.

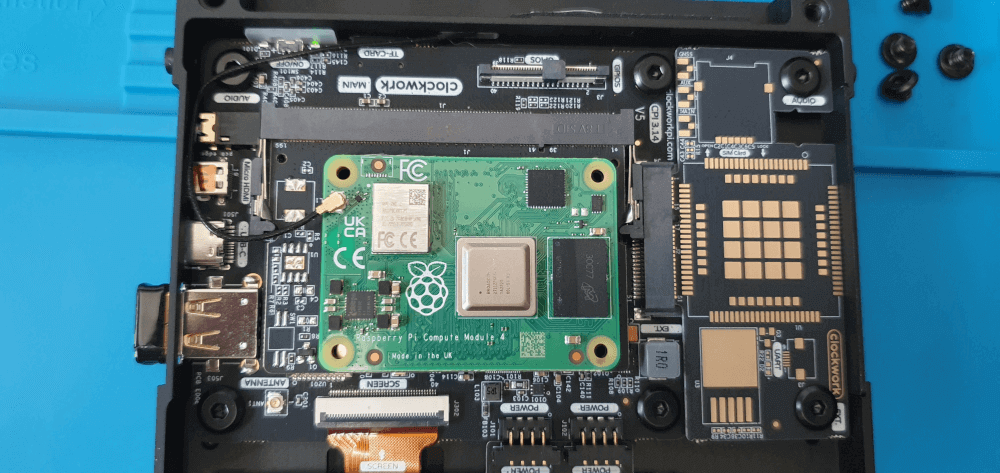
The CM4 just fits into a daughter board using the slots on the underside of the CM4, which then fits into a slot on the main board.
After about 30 minutes I had a fully working uConsole sat on my desk. The only issues I had in the assembly was making sure that the monitor cable was correctly inserted into the main board and that the Wifi antenna was correctly attached to the CM4. These weren't too difficult to overcome, I just needed to make sure that the cables were properly inserted before moving on. There is a second antenna socket on the main board, but this doesn't do anything if you have a CM4 with Wifi capability.
The next step was to install an OS so that I could start using it.
Configuration
To make use of the uConsole a operating system needs to be written to the SD Card, which then slots into the top of the unit.
Unfortunately, it's not just a case of writing whatever system you feel like as the device needs specific keyboard and display drivers to get working. This means that you either need to download and use the specific files from ClockworkPi, or use an off the shelf product with your own drivers installed and ready to go.
If you try to install and use an OS that doesn't have the correct drivers then the keyboard and screen won't be usable, you can still plug a screen and keyboard into the ports on the side of the device in order to get the console running. I have also seen reports of users installing an OS in a virtual machine and installing the correct drivers there.
The best course of action is to head to the Clockwork PI uConsole GitHub repository and download one of their images. Since I am using the CM4 version I downloaded one of their CM4 images, and then installed the OS using the Raspberry Pi imager tool.
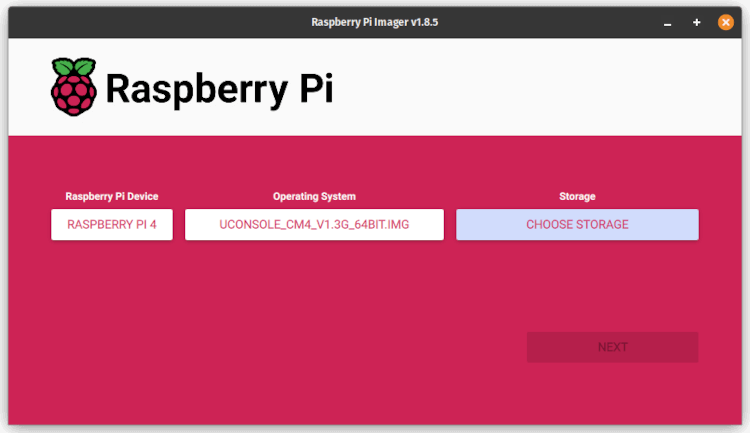
This sets up a version of Raspberry Pi OS, which is based on Debian and so has all the usual programs and services that I'm used to using.
There is also a community driven set of images that take have a couple of different operating systems available for the uConsole, as well as some of the other devices that Clockwork Pi have created. If you go looking you can also find some images that users have created, but your mileage may vary with those as it's difficult to see exactly what has been installed before you run it. Also, I have found that the auto configuration step that the imager tool can do to the image will cause some of the community images to fail.
I highly recommend installing Pi-Apps once you have a running system. The install process is pretty simple and it makes installing extra software so much simpler and you don't have to go searching for arch specific builds or fiddle with compiling you own versions. I spent a few hours one evening attempting to get an Amiga emulator running, only to find that it was bundled with Pi-Apps and took me 5 minutes to get installed and working.
Programming
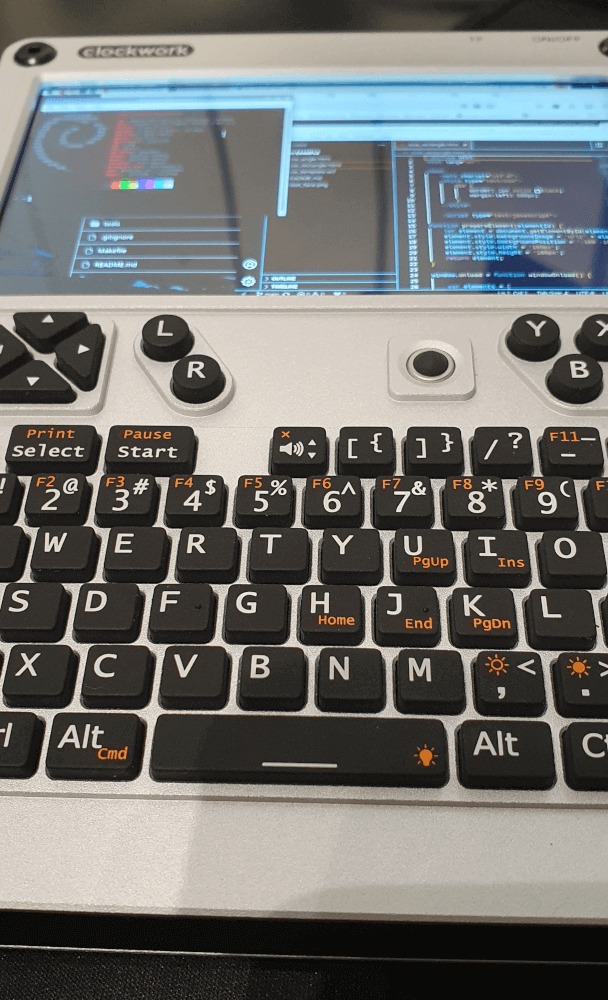
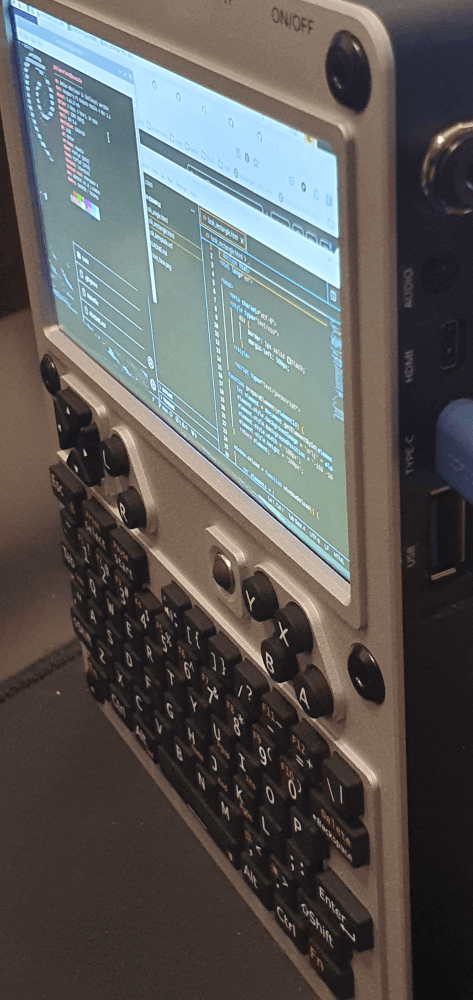
Having a pocket sized machine that runs a full version of Linux is great for on the go programming. The screen is crisp and has a good aspect ratio so it's easy to see a full screen of code and type the needed characters on the built in keyboard. Typing on the built in keyboard does take a little getting used to, but you can easily plug an external keyboard in and use that instead.
The code for the article on creating a mouse looking script with JavaScript was written (and the deployed to the site) using the uConsole. I also wrote a couple of the demos for the Four JavaScript game engine I have been fiddling with recently. All this code was written using VSCode and Firefox was the browser used for testing and writing the content.
I was able to do programming in PHP, JavaScript, Python, PICO-8, and Sonic Pi pretty easily. I was able to get Docker installed, which opened up a few possibilities of running web servers and things locally without having to install them fully.
Whilst, Docker installed ok, the unit doesn't quite meet the minimum requirements of DDEV and so it struggled a little to run everything. I was able to cut down the requirements of DDEV a little and get a Drupal site up and running. It was a little slow, but it worked well enough to manage the site and apply some updates.
Gaming
As an avid gamer I decided to try some games on the uConsole. Although it is possible to install Steam using Pi-Apps, I avoided that as I haven't had a lot of luck running Steam games on Linux.
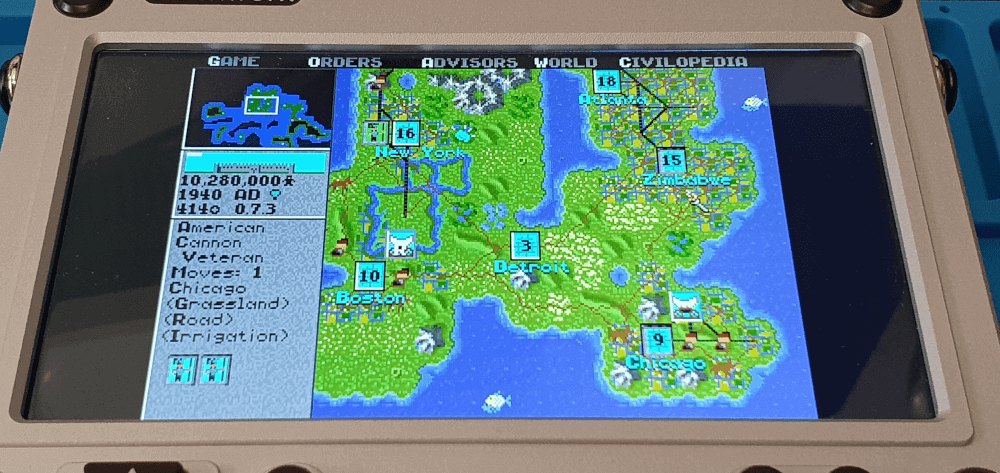
DOSBox
The uConsole can play DOS games brilliantly and there's plenty of old DOS games that you can purchase DRM free or download and play on the uConsole. I downloaded the original Civilization, which works flawlessly and had me hooked for a few hours.
Powermonger and Carrier Command also worked great, although it's a bit difficult to control the aircraft in Carrier Command using the trackball.
ScummVM
Running Beneath a Steel Sky and the is very simple since it is one of the games that comes with the uConsole image, alone with the ScummVM game engine. The game works flawlessly and includes all of the sound effects and voice acting. Having the ScummVM engine installed as well means that there are lots of point and click adventures available that will run very well on the uConsole.
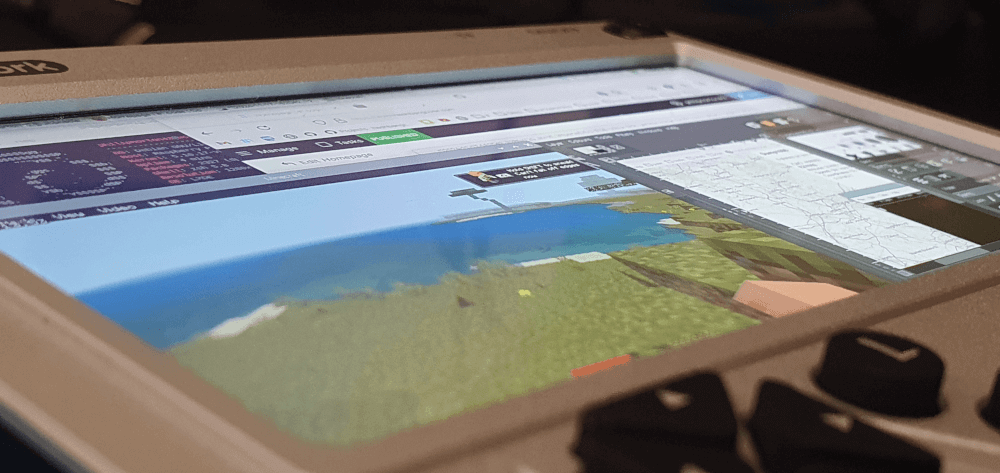
Minetest/Minecraft
The uConsole image comes with Minetest, which is a cut down version of Minecraft, mainly used for educational purposes. I was able to get the full version of Minecraft installed via Pi-Apps, and although it runs, it doesn't run very well. I turned all the graphs settings down to their lowest values and it gets between 15 and 20 frames per second, which is just about playable.
PICO-8
This platform is brilliant with PICO-8 games. I purchased PICO-8 a number of years ago but have only recently started to take an interest in playing and developing games with it. The extra buttons on the uConsole interface really well with PICO-8 and make many of the games easy to play. It feels like the uConsole was built with PICO-8 in mind.
Doom
Well, of course the uConsole plays Doom. You can get the shareware version of Doom running very easily with Pi-Apps.
The Good
There are some good points about the unit.
Design
The design of the uConsole is very good. The keyboard, trackball and screen are well placed and the buttons for arrow keys are in a convenient position. The little kick stand means that you can prop up the unit slightly when using it on a desk. The addition of a USB port on the side means that you can easily connect a USB hub and connect all the peripherals you need. Having a mini-HDMI port also means that it can plug into a monitor and be used as a desktop replacement.
All of the screws used in the uConsole are the same size and can all be tightened by the included hex key. Everything that isn't screwed in simply slots into place and is held in place by the plates of the console itself.
The extra Y, X, B, A buttons make using the console perfect for PICO-8 games and other emulation systems.
Build Quality
Even though you need to assemble the uConsole from parts, it really is a well made and solid feeling unit once put together. The included circuit boards are made of a high quality PCB and look great in black.
The front and back of the case are made out of aluminium, and the centre section is made from a fiberglass re-enforced plastic so it feels very solid. There is very little flex to the unit.
SD Card
Having the SD Card situated at the top of the console means that it is quite easy to swap out cards with different images for different situations. If need some network testing tools then you can install Kali Linux on an SD Card and pop this in when you need it.
Screen
The screen is really good. In fact, the main limiting factor here was my own eyesight as I need glasses to focus on the text properly.
The viewing angles on the screen are great and the resolution of the screen are plenty for the size of screen available.

Battery Life
Technically, the uConsole battery life is dependent on the sort of battery that you select when putting the unit together. The 18650 batteries aren't that common, but can be easily found in most vape shops. I would suggest getting as high a capacity as you can find, but be careful of shops that lie about their battery capacities when shopping around.
I got a pair of 3500 mAh batteries and will easily get 3-4 hours of battery life on the uConsole. The CM4 doesn't really have a sleep feature, so you need to get used to turning it off when not in use, which is perhaps the only downside of using this sort of chip in this unit.
Open Source/Highly Hackable
I haven't modded my unit at all, but I have seen people modding their uConsoles to include radio and GPS receivers or even adding better antennas. I have seen people create additional chips for the expansion port on the left hand side of the unit to supply additional USB ports or ethernet sockets.
All of the specifications and design docs for this device are posted online. You can download 3D models of the case that you can use in a 3D printer, and you can even get all of the device drivers and circuit board specifications for the uConsole. This means that you can do pretty much whatever you want with it, as long as you have the skills (and tools) to do so.
There are lots of people online posting videos or pictures of their uConsoles with all sorts of different modifications. The fact that it is simply running Linux means that there are lots of options available to you to in terms of third party devices, as long as Linux drivers exist.
If that isn't enough then the uConsole does expose the GPIO pins for the CM4 on the main board, all you need is a cable to interface with them.
The Not As Good
Here are some bad points about the uConsole, in no particular order.
Poor Wifi Reception
Actually, the must frustrating thing about the uConsole is the spotty Wifi connection. Since the shell is made from aluminium the areal for the Wifi is poked out of a hole at the top of the unit and attached to the frame using a sticker. This, however, is still not adequate since just facing the wrong way from the wireless access point will cause the network to drop. Most of the devices I have in my office will connect to the Wifi without any problems, but the uConsole is constantly dropping the connection.
I have found that the best thing to do here is to use a small, external, Wifi dongle, which can be plugged into the USB socket on the device. I have even got an additional USB Wifi dongle for use with Kali Linux as that provides much better Wifi coverage than a small dongle.
Speakers
The tiny little speakers supplied with the uConsole are pretty terrible, but they do reproduce sound adequately enough. They aren't really good enough to play music through as the speakers are too small to produce much bass frequencies. I often plug set of headphones into the audio out socket, which.
Keyboard And Trackball
The keyboard isn't brilliant to type on. I have found myself getting used to the feel of the keyboard over time, but I often plug in an external keyboard when using the uConsole on a desk so any limitations of the keyboard are easily overcome.
The built in trackball seems to jump around all over the place. I have seen people buying third party trackballs and apparently these work better than the stock one, but I have been using the trackball that came with the device since I put it together.
Again, having a USB hub that you can plug extra peripherals into is a good idea.
Conclusion
I've been having a blast with this little computer for a while now. The ability to carry a small Linux computer around with me has come in very handy in a few situations. It's small enough to fit into a small back pack and the carry case is full of extra components like an RTL-SDR V4 dongle and a GPS receiver so I can play around with all sorts of signals when I'm out and about. The unit feel so rugged that I don't mind throwing it into a bag and taking it with me.
As long as you remember that this is powered by a Raspberry Pi and as such it shouldn't be treated like a more powerful desktop machine. It you push this little computer too hard then it will start creaking at the edges and you'll see crashes and system slow downs, just due to the amount of resources available. That being said, it's actually quite impressive what I can do with this computer. I am able to open up a command prompt, an IDE, a web browser and a picture editing program (like The Gimp) and still have enough resources to run Minecraft, so it is capable of multi-tasking.
Ultimately, is the uConsole worth £257? In my opinion, yes! This humble little device is way more useful and versatile than an ipad and is much more portable than a laptop. I bought a Samsung tab a few years ago, and I've always been frustrated by the closed wall approach to the operating system. This isn't the case here as everything is open and available.
If you go for a uConsole then I would advise going for the bare bones unit and purchasing the CM4 separately. I think the fact that I went for the 8GB CM4 really helped with the performance of the system.
Between ordering and delivery was exactly 2 months (ordered end of August delivered end of October). I think I only waited a relatively short amount of time due to the configuration I selected. I have seen people who have ordered the uConsole with everything included and waited for nearly a year before delivery.
The delays are clearly being caused by the availability of the CM4 modules and the cellular option. If you order without these then you'll speed up the delivery time, and you can opt for a better version of the CM4.
Here are some more images of the uConsole in action.
Are you interested in the uConsole or do you have one of your own? Comment below and let me know!

Add new comment