I got into mechanical keyboards a few years ago, around the same time that I started to work from home. Since then I have collected a number of different keyboards of different sizes and orientations, mostly in a drive to have a nice feeling keyboard, increase productivity and reduce my RSI.
Whilst keyboards look similar to the uninitiated there are quite a lot of different factors that go into the mechanical keyboard. In fact, there are so many different terms used in the mechanical keyboard world that might need some explaining before you get into things.
In this article I will look into some of the different types of keyboards available by breaking down some of the terms used. I'll then give some recommendations on where to get started, and what to avoid.
This is an introduction and is by no means a complete picture of every sort of keyboard available.
Size
The first consideration in selecting a mechanical keyboard is the size, which is indicated by a number of different numbers and terms. Numbers describing a mechanical keyboard normally indicate how many keys are present on the keyboard, which is either represented by a count of the keys or a percentage.
Keyboard sizes often fall into one of the following categories.
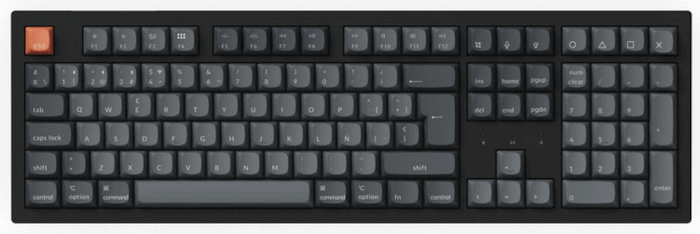
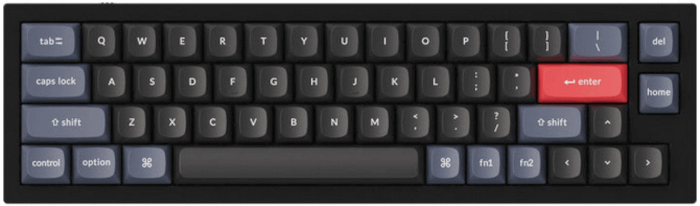
100%
This is the standard keyboard size that you might have probably seen already and is the form factor that contains a separate number pad and control group. This form factor usually has 104 keys, but will often include an extra row above the number pad.
Two terms that are also connected to this size of keyboard are "southpaw" and "normal". This describes on what side the number pad sits, which is normally found on the right hand size of the keyboard.
Southpaw is a term that describes left-handed people, so a southpaw keyboard will have the number pad on the left hand side of the keyboard. It doesn't matter if you are left or right handed when using a normal or southpaw keyboard, in fact, some people swear by using southpaw 100% keyboards as it means they don't need to move their hand from their mouse to type numbers on the keypad.
96%
Basically the same as a 100% keyboard, but it will be missing a few keys to reduce the footprint of the keyboard. The missing keys are normally things like the number lock and scroll lock buttons.
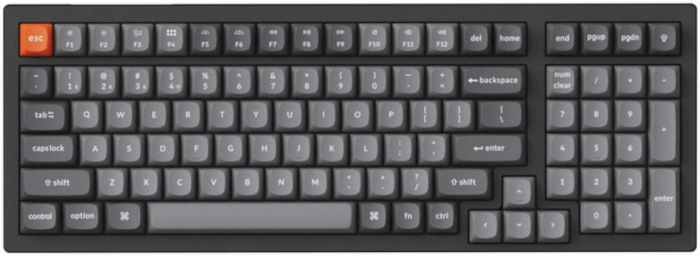
Also known as tenkeyless or TKL, this is a keyboard that lacks the number pad. They normally have all of the other buttons like the arrow keys and the page up, page down, home, and end keys.
75% keyboards are really popular as they have all the usual keys you need for day to day use and don't take up much room on your desktop. It's common to see a design similar to the one pictured above that removes all of the space around the keys in order to reduce the footprint of the keyboard even more.
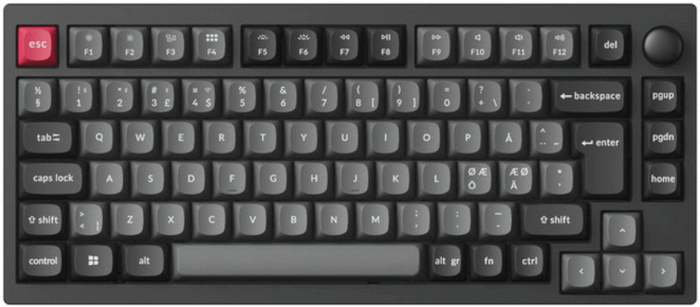
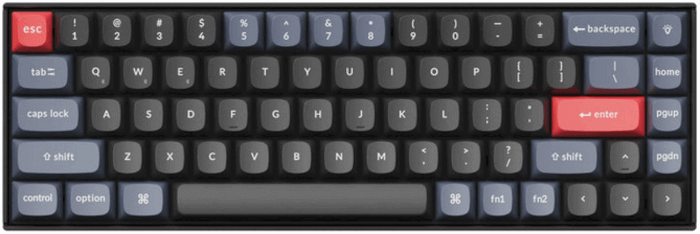
65%/60%
This is a compact keyboard that is actually quite common in the mechanical keyboard world. They keyboard will have all of the letter and number keys but will often lack keys like page up, page down and similar.
60% keyboards can sometimes lack the function keys at the top of the keyboard, but that isn't necessarily the case. It depends on the keyboard maker as to how many keys they decide to include in the design, but most keyboards that lack the function keys are in this category.
50%/40%
Very minimal keyboard that normally contains only the letters and a few other keys, meaning that there are no function keys or number keys. A 40% keyboard is the generally the smallest usable keyboard but can take a bit of practice to get into.
Due to the fact that this keyboard doesn't contain all of the normal keys there are generally dedicated "layer" keys that change all of the keys on the keyboard. For example, to press the key "1" you would press the layer key and the letter "a".
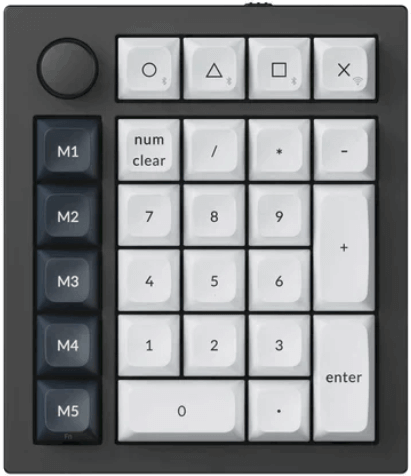
10% or Number Pad
If you have a keyboard without a number pad then you can get an additional keyboard that just contains the number pad on its own.
This type of keyboard are often sold as "macro-pads" and feature fully re-programmable keys that can be setup to enter any key or even combination of keys.
3%/2%/1%
It is possible to find keyboards that feature just a couple of keys. These keyboards are more of a novelty item since they only have a few keys and are used as macro buttons more than normal keys.
Due to their small size these keyboards are often sold as "kits", meaning that you will have to do some assembly or soldering in order to use the keyboard. A fun little project if you are looking for a cheap and functional device to get into soldering with.
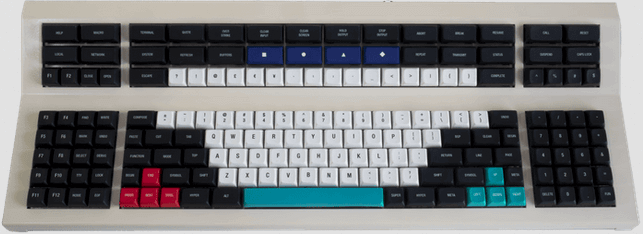
100%+
It is also possible to see keyboards that are over 100%. These keyboards contain lots more keys than a standard keyboard.
These sort of keyboards are found more in industrial and specialist settings since they are typically quite expensive to manufacture.
Layout
The layout of the keyboard is another important consideration in selecting a keyboard.
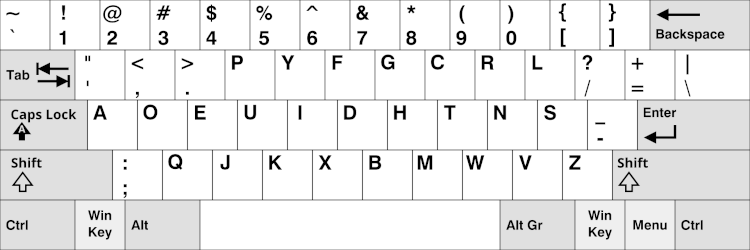
ISO
The ISO keyboard is used in many parts of the world, including different languages. An ISO keyboard can be spotted by the enter/return key being two rows tall and the 2 key being having the alternate function as the " (double quote) key.
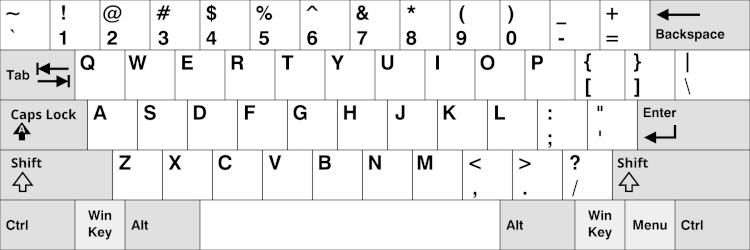
ANSII
An ANSII keyboard can be spotted by the enter/return key being a single row in high. This means that you tend to get an extra button above the enter key, which tends to be a "\" character.
This is popular in the USA but has gained traction in other parts of the world thanks to the popularity of Apple keyboards. People using an extra keyboard or swapping over from the Apple keyboard find it easier to use this sort of layout.
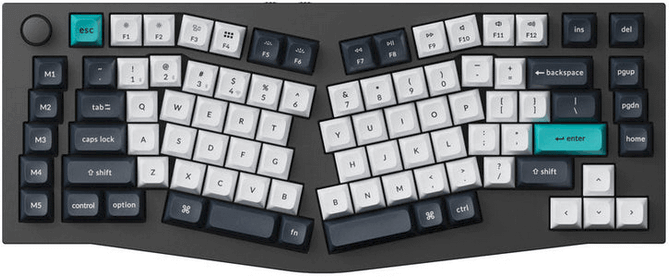
Alice
The term "alice" comes from a Japanese word "Arisu", which is the Japanese version of the name "Alice". The name probably comes from the Arisu river in Japan, which has a curved path. An alice keyboard has the keys separated into two sections, and arranged into a a curve, with the point at the bottom. The idea is that is presents a more natural position for the hands to rest when typing, which helps to prevent straining hands and wrists.
It is common to see two "b" keys on alice keyboards, one on the left and one on the right.
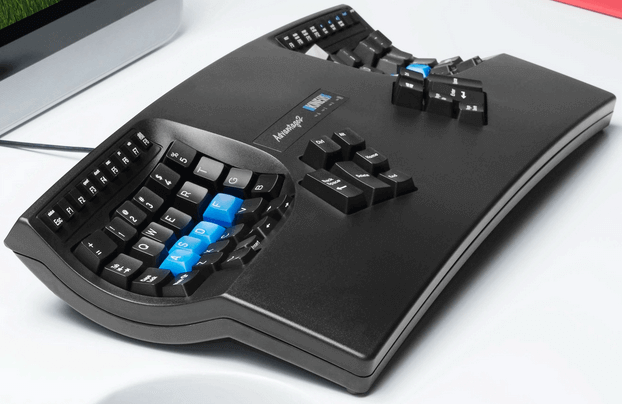
Ergonomic
This is a layout that is similar to the alice layout, but in this case the two halves are set in a small recesses. The idea here is that your fingers are not all the same length and so by setting some of the keys further away it allows for a more natural typing position.
Keyboards were originally designed to be fitted into typewriters, so the keys were staggered so that they could operate the arms of typewriter without getting stuck. They keys couldn't be set is straight lines as each key needed to be clear of interference with other keys on the keyboard. As we transitioned to digital keyboards we kept the original staggered keys, even though they are a bit of an anachronism at this point.
Ortholinear keyboards remove this staggered look so that they keys are sat in straight lines.
This can be either horizontal lines or vertical lines, but it's more common to see both. The term usually refers to a keyboard where the keys are set out in a grid.
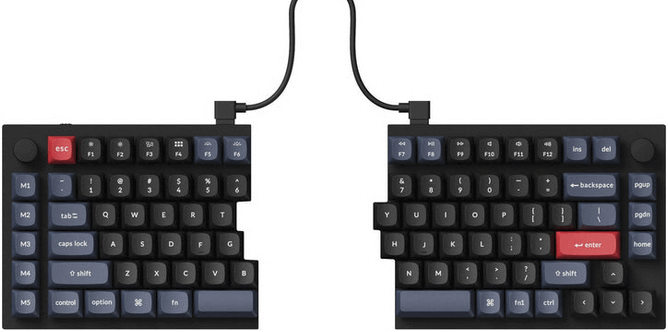
Split
Split keyboards are divided into two (sometimes more) parts that function together to form a full keyboard. This is an extension of the alice and ergonomic layout where the keyboard is simply separated into sections, normally just two sections, although some keyboards can have more.
The reasoning behind this system is that it allows your hands to type in much more natural position, which helps to reduce the strain of typing on hands and arms. Although this sort of keyboard can seem really interesting, they do take a little bit of time to get into due to their unusual layout.
Qwerty
The term qwerty refers to the first letters typed at the top left hand side of a standard keyboard, which is "qwerty".
The qwerty layout.
This is the most common layout of keyboard. It was created in the early 1870s by Christopher Latham Sholes, and was even referred to as a "Sholes" layout for a while. The idea was to separate commonly used letters between each hand in order to prevent jamming in typewriters. The first typewriter keyboards had a-z layouts and whilst people could easily learn to type on them they were often prone to jamming when certain words were typed.
It's a common myth that the qwerty keyboard was created for slow typists down, but this is false. Sholes designed the keyboard to prevent jamming and so speed typing up. The myth that qwerty slowed down typing speed was probably invented by August Dvorak in an attempt to discredit the Sholes keyboard in order to promote his own layout.
More keys were added to this layout after the advent of computers, but the core letters and numbers layout has remained the same for over 100 years.
Dvorak/Colemak
Speaking of Dvorak, this layout was developed in 1936 by August Dvorak. The main aim of this layout is that the most used keys are moved to the "home row" or the middle line of the letters on the keyboard. This means that the vowels are set under the fingers and can quickly be pressed with very little movement.
The dvorak layout.
The colemak keyboard is a more recent tweak to the Qwerty layout. The change here is to move the most frequently used letters of the English language onto the home row, but also keeping many of the keyboard shortcuts (like ctrl+c, ctrl+v) in the same place as a Qwerty keyboard.
I've put these two layouts into a single section as they have never been as popular as the "standard" Qwerty keyboard layout. Proponents of these layouts will often was lyrical about this or that layout, with some people often creating their own layouts.
Most operating systems will allow you to swap your layout so you can easily give these layouts a go.
Switches
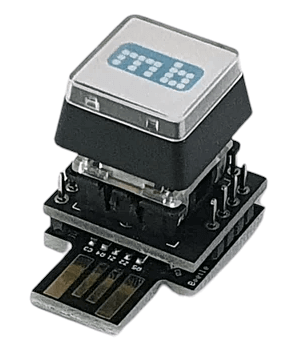
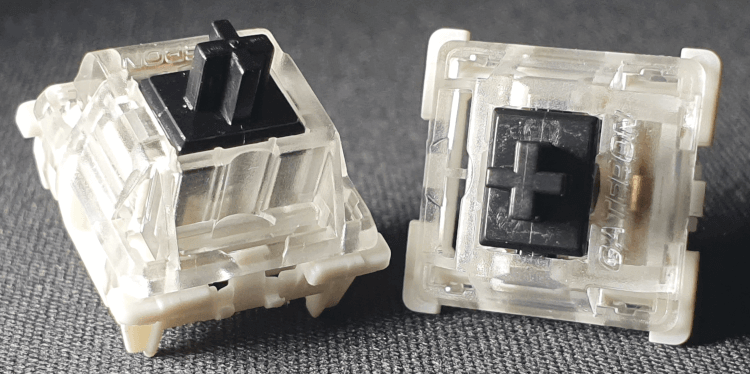
The switch in a mechanical keyboard refers to the device that converts your key press into an electrical signal that can be understood by a computer.
Two Gateron Blacks, a smooth, linear keyboard switch.
These come in various different forms so let's cover the most common types.
Mechanical
This is the most common type of switch in the mechanical keyboard world. The mechanical switch works by pressing two bits of metal together inside the housing of the switch that completes a circuit and generates a signal. This sort of which comes in a few different shapes, but you'll usually see Cherry MX compatible (with a cross shaped pin in the middle of the switch) or a Kailh Choc Low-Profile switches. It's a good idea to know what sort of switch you have before you buy keycaps to fit on them.
Mechanical switches come in a variety of different types, but you will generally see linear, tactile, and clicky. Linear and tactile switches do not make an audible clicking sound when typing, but the tactile switch will have a small "bump" in the key that you can feel when typing. Clicky switches are created to have an audible clicking sound when pressed and can be very noisy. It is not a good idea to use clicky switches in an open office environment as it can be distracting to the people around you.
Switches are also found in 3 pin and 5 pin variants. The wires that connect the switch to the keyboard are always in the same place, and there are always two of them. The extra pins refer to the presents of little plastic tabs on the bottom of the switch. All mechanical switches will have a central pin on the bottom, but a 5 pin switch will also have two little tabs to either side of this pin.
This sort of switch are rated for around 100 million keystrokes, so even though they are considered to be the most fail-able, they still have plenty of life in the before they need replacing.
Hot-swap
Some keyboards are built using hot-swap sockets. This just means that you can take the switch out of the board and replace it with a different switch whilst the keyboard is powered on. The alternative to hot-swap keyboards is to solder the switch directly into the keyboard itself, which means that to swap the keys you will probably have to dismantle the keyboard and use a soldering iron.
Bubble
Bubble switches work by having an area of a circuit keyboard where contacts are formed when another layer is pressed into it, which creates the keystroke. The two layers are separated and formed into bubbles over each of the keys. Bubble switches are often found in game controllers and whilst they can withstand years of heavy use, although these sort of keys are not favored by enthusiasts. They are quite cheap to produce and so many of the cheapest keyboards are created using bubble keys.
Optical
Optical switches work by using a beam of light to detect the key being pressed. The action of the pressing the key breaks that beam of light, which is detected by the keyboard and a signal is sent to the computer.
Whilst not always the case, optical switches tend to need a special keyboard to operate as the light is usually created outside of the switch. Some switches exist that have the beam and the key switch in a single unit, which can be plugged into any compatible keyboard.
Magnetic
Also known as Hall Effect switches, magnetic switches use a small magnetic field to detect the pressing of a key. A magnet in the switch is detected by a sensor in the keyboard and this is interpreted as a keypress. Magnetic switches differ from other types of keyboard in that the amount of key travel can be detected and configured. This means that the keyboard can be setup to have a tiny travel distance before sending the signal of the keypress to the computer. They can also be setup so that you don't need to release the key all the way before pressing it back down again, the keyboard will detect the upwards travel and consider any downwards travel at this point as a new input.
This sort of switch has only been around a few years as it was introduced as a keyboard switch by Gateron and SteelSeries in 2019.
As this sort of switch doesn't work by metal parts touching they can last for a very long time . They also work with very little noise and have a very low failure rate.
Switch Break-In
When you get a new keyboard (or new switches) they can sometimes have small imperfections from the manufacturing process that can cause scratchiness or just inconsistent feeling keys. The term "break-in" refers to the process of using keys until they have reduced these imperfections and have an overall better consistency.
It is even possible to get machines that will accelerate this natural wear without causing problems with the switches themselves.
Keycaps
The keycaps you use for your keyboard have a big impact on the look of the keyboard and the feel of your typing experience and the noise that the keyboard makes. There are a few things to consider with regards to keycaps.
Profile
The first thing to think about with keycaps is the profile of the key. There are a number of different profiles available but they mostly fall into either uniform or staggered arrangements (with some variations between these two as well). Some profiles also have different key shapes, with some profiles having flat tops and other profiles having concave tops.
Staggered keycaps will have different key heights, which means that the keys higher up the keyboard (i.e. at the top) are higher than keys lower down the keyboard. This is usually difficult to spot unless you take one of the function keys from the top row and put it on the bottom row. Keys with this profile can be great to type on as it gives a slight incline to the keys, although they are normally suited for one keyboard as is can be difficult to mix and match keys from different sets.
Uniform keys do not have this height difference and so are better for flat or non standard keyboards. For example, some split keyboards will have keys in different locations than they are expected to be in a "standard" keyboard, and so if you use a staggered keycap set you'll find that keys stick out of the typing surface too much.
Some notable keycap profiles include:
SA (Spherical All) - High profile with a rounded or concave top and staggered row height.
KT/KAT (Keyreative All Touch) - Shorter and more rounded versions of SA.
MDA - Mid height, concave tops with a staggered profile.
OEM - Medium profile, angled typing surface, with angled key tops.
Cherry - Similar to OEM, but shorter.
XDA - Low profile, concave typing surface, uniform row height. A uniform version of MDA.
ABS stands for Acrylonitrile Butadiene Styrene, which is a type of plastic used for a large number of objects, like Lego bricks for instance. Most cheaper keycaps are made from ABS but they tend to be softer and cheaper feeling than PBT keycaps.
PBT stands for Polybutylene Terephthalate, which is a more robust plastic than ABT, which means that it won't wear down as quickly when used in keycaps.
As a side note, it's also possible to get keycaps made from metal, wood and even ceramic.
Doubleshot
This term refers to the manufacturing process, in which the key cap is created in a two stages. The first stage usually consists of a transparent material that includes the key legend, and the second stage builds around this to create the full keycap. Creating keycaps in this way produces a more durable keycap, where the legend won't be rubbed away by use since it is built into the structure of the key. It's also a good choice for backlit keyboards as the light shines through the layers and means you can even see the letters in the dark.
Lights
Lighting has become an important part of a mechanical keyboard and there are a few options available when selecting lights.
White/RGB
Generally, when a keyboard is said to have lights it means that each key on a keyboard will have a dedicated LED light.
When LED lights were first introduced into keyboards they only came in a white variety. As the cost of multi-coloured LED lights reduced it become commonplace to have a white variant of keyboards at a reduced cost. These days it's quite common to find mechanical keyboards that have full RGB lighting with a mode available to set the keyboard to full white.
The use of LED lights means that keyboards can be given lighting effects. Everything from a single glow, to animating keys as they are pressed, to swirling patterns of lights. There are a number of different variants available, but most keyboards will feature the same few patterns of chasing lights and lights that react to the keys being pressed.
In a darkened office, LED lights can really make a keyboard look amazing. Try to look for a keyboard that stores the LED lighting settings on the keyboard itself, rather than on your computer as it means that your lighting preferences aren't controlled by proprietary software and will be the same for any computer you plug the keyboard into.
North/South Facing
North facing keyboards have LED lights that are at the top of each key, south facing have LED lights that are at the bottom of each key.
What you like in terms of north or south facing depends on your preferences and some enthusiasts will say that north facing will look better. Many keyboard switches are now built with a small hole that allows for any LED lighting to shine though, so the argument of north facing lights being "more vibrant" doesn't really apply.
Underglow
Some keyboards even have underglow options, where LEDs are build on the outside of the keyboard. This is a fairly rare feature in the mechanical keyboard world.
Software
An important part of considering a mechanical keyboard is the software it uses. This is both in terms of operation of the keyboard itself and additional functionality. Basic mechanical keyboards usually do not come with any extra software and do not allow any customization of the keyboard.
Proprietary
Some keyboard manufacturers bundle some sort of proprietary software with their keyboards. This is especially the case with some of the larger brands like Razer or Corsair, but it's certainly possible for smaller companies to write their own software as well.
If the keyboard comes with proprietary software then you'll need to check that your operating system supports that software.
QMK
Quantum Mechanical Keyboard (or QMK) is an open source firmware for micro-controllers that control computer keyboards. Whilst QMK is highly customisable, it does require some knowledge of C to start writing your own keyboard definitions.
If your keyboard comes with QMK firmware it generally means that you can alter it as much as you want, adding in layers, shortcuts and other macros to assist your typing experience. The key here is that the options you set live with the keyboard, rather than being controlled via a third party.
VIA
VIA, in the most basic terms, is like an interface that runs on top of QMK and allows you to easily modify your keyboard without having to write C code. This is a very popular addition to keyboards and means you just need a web browser (Chrome and Opera are the best supported) and a link to the https://usevia.app/ site and you can modify the keyboard to suit your needs.
One thing that VIA needs is a definition file, and although many manufacturers are good at registering their keyboards with VIA, you might have to download a json file to get the full benefit of the system. Other than getting hold of the VIA definition, the use of VIA makes your keyboard entirely customisable. You can reassign any key on the board, create macros, and even alter lighting effects, all of which is stored in the memory of the keyboard itself so the settings are transferred to any computer you plug the keyboard into.
ZMK
ZMK is an alternative to systems like QMK, and tends to be used when features like Bluetooth Low Energy (BLE) are required by the user.
Other Considerations
Some other considerations in the mechanical keyboard world include.
Cables
Of course, there's no point spending hundreds on a amazing keyboard, only for you to connect it to your computer with a cheap USB cable.
Many keyboards include a wireless connection, but they still need to be plugged in every now and then to keep the battery charged. It's surprising how deep you can get into just the cable of the keyboard, and there exists lots of services that will create a custom keyboard in any colour you want.
Cables can also feature coils and detachable connectors that don't do much, but make the cable look just as nice as the keyboard they are attached to.
Gasket Mounted
This refers to how the keyboard is attached to the case. The gasket refers to a rubber or soft plastic bung that sits between the PCB and the case itself and is intended to reduce the amount of noise created by the typing action. Gasket mounted keyboards will have a little "give" in the keys and have a softer typing action than PCBs that are screwed directly into the base plate.
Low Profile
A low profile keyboard is just as it sounds. The keyboard is obviously thin, but that doesn't mean it can't have mechanical switches or nice looking keycaps. Going for a low profile keyboards means that it will also need low profile switches and low profile keycaps, both of which are available, but you might find that there are some compatibility issues when selecting components for a low profile board.
Case Material
The material of the case of a keyboard effects it's weight and rigidity, as well as the sound profile it makes when used. The case material is important in low profile keyboards as plastic keyboards tend to have quite a bit of flex in them. High quality keyboards will feature a full metal case construction as this gives the keyboard a little bit of weight, and makes it a solid platform to type on.
Weight
The last thing you want your keyboard to do whilst you are typing is to move around on the desk. For this reason some keyboards will clearly show how much they weigh in order to show enthusiasts that they are heavy enough to not move.
Some keyboards also have the option of adding additional weights that to give it more weight than it would otherwise have with just the case and components alone.
Built In Screen
Some keyboards come with a little screen built into the keyboard. Some of these are tiny little screens that are just used by the keyboard, but you can also find keyboards with built in displays that accept a USB-C or HDMI signal.
Whilst these are pretty cool, I would advise a little bit of caution with novelty screens like this. Some screens can only be used with dodgy proprietary software that only works on certain operating systems so it's worth doing a little bit of homework before going for a keyboard like this.
Ok, So Where Do I Start?
If you are interested in getting into mechanical keyboards then I would recommend one of the simpler Keychron keyboards like the C3 or the C1. These are good entry level keyboards that still have all the good features like mechanical switches, gasket mounts, RGB backlights, and even a high polling rate. You will want to get a keyboard for less than £60-£70 that has all of the switches and keycaps installed. All of the Keychron keyboards are really well built and work solidly even hours many hundreds of hours of use.
I would recommend going for either linear or tactile switches as clicky switches can be annoying if you aren't used to them (and probably annoying to everyone around you). You should also look at trying to get a keyboard with hot-swappable switches as it means you can swap out the switches without having to de-solder them from the PCB.
Once you have used your basic keyboard for a while you'll have a good idea of what you like about it and can look at either upgrading/modifying it to suit your needs or moving to another keyboard. There are a number of good keyboard brands around that are making very decent keyboards that are worth looking into, and even a number of custom sites building specialist keyboards to suit every need.
If you want to get started in mechanical keyboards then don't get the cheapest thing that you can possibly find. It might have flashy lights, but it will feel flimsy to type on and will probably have a few issues like inconsistent key presses or wobbly space bars that will drive you mad. Don't walk into the nearest pound shop and pick up a "gamers" keyboard for less than £10 as it will be very bad.
A cheap and flimsy keyboard will almost certainly wonder why people would spend any time getting a keyboard and put you off the hobby entirely.
Whilst you can go for a high end custom build I would avoid that unless you have tried lots of keyboards and know exactly what you want. Custom built keyboards can be very expensive (like in excess of £400 sort of expensive) so I would avoid spending that much getting into something that you will end up not liking.
I would also avoid getting a keyboard that is somewhat specialist. Some keyboards, especially split keyboards with multiple layers, have a distinct learning curve and will take a bit of getting used to. Whilst enthusiasts might tell you they are great keyboards and gave them a boost in productivity, they will slow you down significantly whilst you re-train your typing for that keyboard. Learning how to type all over again can cause a bit of a negative experience and you will probably end up hating your new keyboard.
This is why I suggest going for a cheap Keychron to start with. They are a decent brand, and even their low end keyboards have some nice features that will produce a nice typing experience.
Conclusion
I've gone through a large variety of different options here, but the reality of the mechanical keyboard market all of these different options can be combined together in a variety of different ways.
That is the best thing about mechanical keyboards, that nothing is set in stone. You can often find unusual keyboards that merge together different features from different keyboards and brands to make something unique.
I have a number of different keyboards in my collection now and I have used all of them for many hours. Here is my keyboard collection as it stands now.
Keychron K2 - A 65% keyboard and my first entry into the mechanical keyboard world.
Keychron Q3 Pro SE - TKL keyboard with a programmable wheel and custom macro buttons.
Keychron Q13 Pro - 96% Alice with a programmable wheel and custom macro buttons.
Keychron Q9 - A 40% keyboard.
Keychron Q11 - A split design keyboard with two programmable wheels and custom macro buttons.
I have linked to pages where I have written reviews, but expect more reviews on the above in the near future.
As you can see from this list, I'm a bit of a fan of Keychron. Their keyboards are really well made and solid, feel great to type on, and aren't that expensive. I am currently looking to see what other keyboards exist on the market so unless they sent me a keyboard to review (hint!), I won't be buying a Keychron for a while.
Most of my keyboards offer something different from the others, both in terms of shape, layout, typing feel, and even style. I started out with the K2 since it was small and had good Mac support, but I think the jump to the Lily58 was a bit too much for my brain since I was used to the static layout and the split design and different key position caused me to stumble quite a bit when learning to use it.
There are a million terms that you will see used in the mechanical keyboard world, and this article only goes over a few of them. Please ask me if you have any questions about mechanical keyboards. Remember, it's all about the "thock" :)
Are you into mechanical keyboards? If so let me know what you are currently using and what you like about it in the comments.
Please note that some of the links above are affiliate links and by clicking on them this site gets a small amount of commission.
When I bought my Keychron K2 in 2020 I was happy with it for a couple of years before I wondered what other options were available. During that time Keychron lunched quite a few different keyboards, including updates to the K2.
The Kiwi Ears Ardor are a set of over ears headphones that have Bluetooth, AUX cable and USB-C connectivity. They also include active noise cancelling (ANC) and can be used to make and receive calls when attached to a phone.
In this article we will look at the headphones, what their features are, how they operate, and how they sound.
I was doing some research into the Raspberry Pi a while ago and I happened to come across a neat little enclosure for the Raspberry Pi Compute Module 4 (CM4) called the uConsole.
Somewhat recently, I was introduced to the concept of customisable mechanical keyboards. I do a lot of typing, mainly writing/story work, so the tool I use is quite important, I’ve just never given it much thought before.
I was scrolling through The Pi Hut website recently and my eye was drawn by a case for the Raspberry Pi Computer Module 4 (CM4) that looked like a modified Nintendo Gameboy.

Add new comment